Containerization
Verb: embracing lightweight and isolated code execution environments by implementing software services in containers, popularly Docker containers
Verb: embracing lightweight and isolated code execution environments by implementing software services in containers, popularly Docker containers
Containers are incredibly useful, even when just running images built by others. However you can make your own container image as your custom solution for anything you like. The key element is to write your own Dockerfile. As an example I will write a Dockerfile to run a Minecraft server below. As you’ll see, this can all be accomplished in very few lines of code.
Container images need to be built on a base image. And as we’re most often hosting Docker on a Linux distribution, we need a Linux distro as the base of the image. The most common Linux distribution to use for containers is Alpine Linux, due to it’s small default footprint and performance tuning.
While Alpine Linux is great as a container base, it uses its own flavor of all of the basic utilities. For example, the package manager for Alpine is not apt or yum/dnf… it’s a utility called apk. Keep an eye out for the Alpine variations of commands that are noted on this site in order to use Alpine well.
Since Dockerfile commands are more-or-less the same commands you would issue to a full installation of your chosen Linux distribution, completing a test installation to a full virtual machine first can be very helpful for figuring out the commands you need for your container image. Once you have the list of commands from the full virtual machine installation you are only left the much easier task of adapting those commands for use in your Dockerfile.
It should be easier to understand the layout of the Dockerfile by stepping through the creation of an example. Let’s say that I was running my own Minecraft server on a traditional server or full virtual machine, but now wanted to run it in Docker instead (running it in Docker would confer the benefits of containerization: portability, faster service start up, easier management through division of the service into components, etc.) To prepare I am building a traditional virtual machine in order to record the commands needed to get the environment up and running. Since I intend to build the Docker image based on Alpine Linux (the most popular base for Docker images) I will also build my test virtual machine on Alpine.
For anyone who wishes to run the Alpine install long-term, instead of the container, check out the Alpine installer configuration options I used
After completing the Alpine install on a fresh virtual machine I issued the following commands to install a Minecraft server:
iptables and set it to start automatically, then define the traffic rule, as below. Minecraft server utilizes TCP port 25565.tmux session. The Xms option defines the minimum memory to allocate to the Java virtual machine, and Xmx defines the max that it will ramp up to. tmux is used in place of the common Linux command screen, which is not being supported as broadly anymore. tmux allows a program to run in a detachable shell session, which is especially handy for programs like Minecraft server that do not exit after running (they continue to run continuously) and can accept commands from the command line while they still run in the background. In other words, if Minecraft was coded to run in the background on its own and accept commands through a utility program, tmux wouldn’t be needed.Use the keyboard combination CtrlbSpaced to breakout of the tmux session (detach it). Use the command tmux attach-session to reattach to the last running tmux session. Use CtrlbSpace? while in a session to list commands.
The Dockerfile should be formatted in Unix EOL format, which is easiest to achieve by using a program like Notepad++. You can find the setting for the Unix EOL under the menu Edit > EOL Conversion > Unix (LF).
Create a file called Dockerfile with no file extension. It should be filled with the following lines:
RUN command causes a command to run during the image build process (not afterward, when the container is instantiating). The command here adds the Java JRE package from the Alpine repository. Interestingly, there is no need to enable the communitry repository this time, probably since the Docker Alpine base image already has it enabledCOPY command creates it. Including the trailing slash in the command below copies the file to the specified directory, rather than copying to the file system as a file with the new file name specified.WORKDIR command changes the selected working directory within the image, during the build process and for build purposes onlyENTRYPOINT command. This command records to the image any commands that an instantiated container should run when it starts up. Alternatively we could have used the CMD command, however there are important distinctions between these two commands:CMD can be overridden by specifying a command when instantiating a container (during the Docker command call). ENTRYPOINT does not allow this.CMD and ENTRYPOINT: shell or exec. The preferred form is the exec form, which is shown below with square bracket notation and with each argument passed in a comma separated list. The shell form passes the command just as it is usually issued on a command line. The difference is how the shell form expands variables, and the exec form does not, unless you use the exec form to call the shell directly as is done below.CMD or ENTRYPOINT commandENTRYPOINT then it makes sense to include the code to set the EULA file IN the ENTRYPOINT definition, along with everything else.java command behind a tmux command inside the container. This idea is useful in a full virtual machine so that the virtual machine can still be interacted with (for updates, administration, etc…) while the Minecraft server runs. If you need to do these same things for a container you would just stop it and update the image build, then relaunch the container. So tmux is no longer needed.iptables. In the Docker Compose definition we will create later we will define port mappings through the Docker API. Docker will impose these port mappings on the running container using iptables on its own. So we don’t need to add iptables ourselves.Expand here to see the full Dockerfile, all together this time
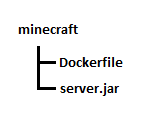
While you could certainly construct your Dockerfile to not require accompanying source files, my end goal is to upload the bundle as a .tar file to the image build section in my Portainer Docker management system. In order for me to get a successful build I need to create a directory on my admin machine and place the Dockerfile and the Minecraft server.jar (obtained from Minecraft Server Download) in the top level of the directory, then create a .tar file where these files are at the top level of the .tar file. You can create a .tar file with the 7zip archiving program. When selecting the files to include, multi-select the Dockerfile and the server.jar files and then have 7zip create the .tar - don’t tar the directory or else this will cause a directory to exist at the top level of the .tar file.
Next we upload to Portainer and build the image. I named my image minecraft:custom, which will be referenced in the Docker Compose
The final step is to create a Docker Compose for your image to be launched from. In Portainer this is done by creating a Stack. However, before we create the stack we should create a Docker volume and network
The volume definition is trivial as you only need the default options. You can set the name of the Docker volume to minecraftdata.
Your network definition will depend on your network setup. In my case I will need to define a new VLAN with specific rules in my firewall, tag this through my switch and hypervisor down to my Docker host, and then into a new Docker network definition. Alternatively you can use the port mapping that I show below and simply point your Minecraft client at the IP address of your Docker host (not recommended for production deployments as this can carry security concerns).
The elements of a Docker compose definition are discussed elsewhere on this site, so I will cut to the chase of the full compose definition below:
Launch this definition and you will see the container start and run, and then with a few more minutes’ time the Minecraft server will be available at the IP address of your Docker host. With the Docker volume in place, even if you take down the running container and start it again, the server will still load the server data and the save. Without the Docker volume a restart of the container will lose all game progress and start a new world.
See further information about Docker networks here: https://docs.docker.com/network/drivers/
In my Docker environment I make use of a few Docker Swarm features and also run Swarm on my single Docker host in preparation so I could add more Docker hosts to the swarm in future. Of the various Docker network types the basic ones are: Bridge and Overlay. Bridge is scoped for use on an individual Docker host (not swarm-aware), while Overlay is swarm-aware.
Each type of network is enabled through use of a specific driver, so Docker network types are also referred to as Docker network drivers. Docker provides an excellent summary of each driver on their documentation page (linked above), so I’ll just say what they’ve said. The ones that I typically use are in bold:
In my homelab environment I am the administrator for every aspect of service delivery, including system administration and network administration. Network firewalls are still a recommended security technology for all types of networks, and I certainly run one myself and recommend it for any homelab network. Modern firewalls provide many services useful to a homelab network, not least of which is a firewall’s primary function - the list of traffic forwarding rules. Since firewall rules are still based on where traffic came from and which interface, IP address, or port that it wants to go to, managing network traffic destined for containers can become messy with each container using the Docker host’s IP address. Using MACvlan networks to make containers “first class citizens” on the network means firewall management becomes more organized. Each Docker MACvlan network is its own VLAN and thus is a separate interface in the firewall, which simply enhances the organization of firewall rules. There are security considerations as well, especially for environments where traditional VMs and containers operate side-by-side.
For a more complete discussion of network security practices for Docker MACvlan containers and subnet separation, please see my article (Network Security Through Subnet Separation) on the topic
Hugo is a popular open-source static site generator. A static site generator creates flat HTML files rather than relying on dynamic content like Javascript. Static sites typically have a smaller storage requirement and are more performant than dynamic websites, though they also have a much reduced feature set. However most people would say a site that supports full dynamic content that is used just for article content (like this site) would be a waste.
There are a fair few Hugo Docker images out there, but I decided to make my own to practice Dockerfile creation and to fully understand the image that I end up running. Please see my article regarding building a Docker image for the first time as a prerequisite to this build.
In addition to the Dockerfile for the .tar file I’ll be creating I also need to include several other files:
SSH server is also installed so that the site contents can be managed by the administrator. Tips on defining content for a blog site in Hugo is covered in another article.
The last line of the cron file must be an empty line in order to satisfy the syntax of the cron file
Also See Official Docker Documentation Install Docker Engine
While other methods are provided in the offical documentation (see above), I prefer adding the offical Docker repository to my package manager as my source for Docker packages.
Even though the repo URL used above references ‘centos’ these packages are suitable for Red Hat-family OS’s. Fedora and RHEL have their own URLs, so you can use those for Fedora and Red Hat respectively as you wish (see the documentation).
Add the packages
In the past Docker Compose would need to be installed from a separate Github project, but these days the enhancement is added with the docker-compose-plugin package. Nice!
Enable the Docker system service and start it
Portainer offers an excellent management webgui for your Docker host. Simply run the Portainer Docker Compose project to get it going. See my article Installing Portainer to get the steps.
When considering my designs for hosting services in containerized or virtualized infrastructure I realized that I could reduce all services to containers and then just run docker engine directly on my server farm (an environment with 100% containers, 0% VMs). In the end I chose to install a VM hypervisor directly on the servers instead (ProxMox VE), with docker installed as a virtual machine. This allowed me the flexibility to run full virtual machines from time to time, while most of my services would be containers on Docker. ProxMox has compatibility to run LXC containers directly, but not Docker containers; I enabled Docker containers by running my Docker engine inside a full virtual machine under ProxMox.
Initially I had concerns about how performance would turn out, but for the workloads I run in my homelab this hasn’t been a real concern. For the type and quantity of services run in a home lab I don’t have any problem recommending this setup.
![]()
![]()
See official Portainer installation documentation for Community Edition on Linux with Docker Swarm
A vanilla installation of Docker can be entirely managed through Docker’s command line tools, however graphical tools like Portainer offer a GUI representation of commands and are preferred by some administrators. Portainer’s GUI is a webgui, providing the additional benefit of managing your Docker installation through a web browser instead of a locally installed app.
Portainer is offered in a free community-support-only edition (Portainer CE) and an edition for business with paid tiers and direct support (Portainer BE). The business edition includes features that aren’t available in the community edition, though these features are typically of interest for business computing environments, including: tying to centralized access management systems, additional security and reporting, and auditing features. All editions of Portainer also support Docker Swarm, Kubernetes, and Azure ACI.
Portainer can be run with a one-line Docker command, however since I like to launch Portainer without needing to remember all the options, using a Docker Compose file is much better. This also allows me to add comments (like the previous image version of Portainer that I had running before I did an update) and provides a visually organized layout for the options I use.
docker volume create: replace portainer_data with whatever name you want for the volume, but be sure to continue replacing it in upcoming commands as well
docker network create: be sure to set your own values for subnet, gateway, and parent (which should be the name of your network adapter that connects the docker host with your VLAN). portainer_network should be whatever name you want docker to know the network as.
See my short discussion on my preference for macvlan Docker networks when separating containers into externally routed VLANs here. TL;DR it enables secure isolation of containers when managing through an external firewall
Certificate: I also wanted the Portainer webgui to use proper HTTPS, however I’m not serving the webgui to the internet and can’t (and don’t want to) pull a LetsEncrypt certificate. A self-signed certificate would still throw an error in my browser (unless I also installed the certificate to my workstation), but I have a better solution since I run my own local certificate authority - i.e. generate my own server certificate and install the root certificate from my local CA. This is why you see options to include Portainer’s SSL certificate shown in the compose yaml below. Don’t forget to create and upload your certificate and key files to the Docker host! - put them in a folder named ssl/ in the directory where you have your Portainer docker-compose.yml file.
HTTPS: Lastly, to enable use of the certificates previously mentioned and turn on HTTPS the ’entrypoint’ section is added to the Portainer compose file. This line disables serving Portainer on HTTP while specifying the HTTPS port as 443 (Portainer’s default is port 9443).
This section assumes that you have Docker Compose available in your Docker host somehow. Contemporary Docker installation can include a native plugin to enable Docker Compose - in the past this would have required obtaining the source and running Docker Compose separately. See my article for Installing Docker to see how I add Docker Compose.
Once you have Docker Compose available make sure your current directory is the one containing your Portainer Docker Compose yaml file (docker-compose.yml), and your SSL directory containing your certificate and key inside.
Kubernetes (also written as k8s) is an advanced container management and orchestration platform. It sits above the container management engine, which provides command interfaces for running containers and managing them. Docker is one example of a container management engine; Containerd is another. In fact, Docker is more of a hybrid, providing enhancements and programming interface to the Containerd engine it actually uses under the hood. As k8s sits above Containerd and Docker, it is required to install a container management engine when installing k8s.
In the past Docker directly developed a shim that would interface between itself and k8s, but has since ceased development on it. This produced blog posts announcing that k8s could no longer support Docker. However, development for the shim was picked up by Mirantis. It can found hosted on Github: cri-dockerd
Docker images are purposefully minimal and notoriously omit standard utilities an administrator would need during troubleshooting. See below for reminders of package names to use for reinstalling these utilities