Core Network Services
LAN services are core to managed networks, providing:
- identity
- centralized policy
- sometimes domain name services
LAN services are core to managed networks, providing:
Certificates are an integral part of service security, including within a LAN itself. Therefore it’s worthwhile for every managed network to include a certificate services server.
There are various Linux packages that provide commands for generating X.509 SSL certificates and requests, but one of the most prevalent is openssl. To generate a new certificate signing request, use the following command:
Provide the sslcert.csr signing request to your certificate authority.
A category of local area network services that primarily serves as organization for domain objects and acts as the domain authority.
In the past directory services have included services that are typically managed as separate services today, such as:
based on: https://www.tecmint.com/integrate-centos-7-to-samba4-active-directory
Starting with a fully installed CentOS (Red Hat-family OS), set your hostname with:
Install required packages:
Synchronize to domain NTP server:
Use authconfig to join the domain:
Give it your domain admin username and password when prompted. No need to include domain/ or @domain.tld in the username.
Edit your samba config with the following:
Add the following after the line:
kerberos method = secrets onlySave and Quit
Test you configuration with:
Linux samba tools are compatible with Microsoft Active Directory, and allow Linux client OS to attach to the AD domain, albeit with some limited functionality.
Before joining to the domain, set your static IP address (or do so during setup, or leave DHCP enabled)
dnf -y install NetworkManager
systemctl enable --now NetworkManager
nmcli connection modify <iface name> ipv4.gateway <gateway ip>
nmcli connection modify <iface name> ipv4.address <ip address>
nmcli connection modify <iface name> ipv4.dns <dns ip address>
nmcli connection up <iface name>
apt-get install network-manager
systemctl enable --now NetworkManager
nmtuiapk add networkmanager
rc-service networkmanager start
rc-update add networkmanager default
adduser <your username> plugdev #you will need to relog to apply the new group membership
nmtuipacman -Syu networkmanager
systemctl --now enable NetworkManager.service
nmtuiNIS is the traditional domain controller and identity service for Linux-only environments. It still works fine for this purpose today, but it is more limited than LDAP. It replicates the data in /etc/ from the group, hosts, mail, netgroup, networks, passwd, printcap, protocols, rpc, and service directories - out to all domain joined hosts in the network. These files comprise information that is also stored in LDAP when connected to Linux. However LDAP is also compatible with Windows where NIS has only limited Windows compatibilities.
LDAP is an extensible data framework, meaning that it can manage data for tasks that many not be explicitly defined by standard LDAP structures. That is to say, LDAP can be customized to store data for whatever purpose the network needs. Examples of LDAP data constructs are:
Therefore, LDAP is generally preferred over NIS when supported, and especially in heterogeneous environments. Even Linux-only environments may prefer to deploy and LDAP directory, since LDAP has become so ubiquitous. This is also influenced by the Samba project(https://www.samba.org) which is the free and open source implementation of LDAP.
Though samba-tool is a frequently referenced command when working with Samba directory services, it fails to provide more than the most frequently used functions for interacting with LDAP, such as: add user, delete user, set password, etc. A more detailed utility is pdbedit.
While trying to launch AD Users and Computers I found that my Administrator account would not connect the snap-in to my Samba server, which is usually and indication of account lockout (probably due to too many bad password attempts). You can use pdbedit to determine if a Samba account is locked out:
Relevant attributes for Samba user accounts:
Considering we are dealing with an account lockout, use the following command to unlock an account:
But that only resets the bad password count, so we must also reset the account flags with:
That will reset the account flags to [U ], but you can specify which flags to reset, for example with [N D H L X].
In this case the trouble didn’t end up being account lockout… somehow my RSAT tools had become uninstalled on my local machine, so the fix was actually just to reinstall them 😑
Name services or “Domain Name System (DNS)”, sometimes confusingly called “Directory Services”, refer to the network service(s) responsible for translating the names of domain objects into IP addresses. The idea being that even a small number of numerical IP addresses are difficult to remember, while a similar number of names (i.e. redbarrel.net) are easier for humans to deal with.
DNS names are structured using . as delimiter between segments of the name, also describing the DNS hierarchy for that object.
A partial DN, even if it is just the object name on its own. An RDN is thus meaningless without a reference to a location in the directory. It is also possible to cite the same RDN for two different objects; though no two objects may have the same DN.
cn=csantanacn=csantana,ou=UsersDue to the special meaning of the . I ended up finding extra “functionality” in the Microsoft Management Console (MMC) DNS client. I had been using this DNS client to manage my Samba domain and decided to create a new DNS entry for wap.homenet. Since the new object name included the . the DNS client treated it as a relative distinguished name and created an OU called homenet, under which it placed the wap object. I suppose I prefer this instead of having the DNS client simply give an error telling me that . is not allowed in object names. This functionality certainly can make creating new object OUs more streamlined.
Since I wasn’t expecting this I ended up trying to delete the OU in MMC DNS client, but was given the error that deletion wasn’t supported for this type of object. I guessed this was because my DNS server was based on Samba rather than Active Directory (with MMC DNS likely expecting to be connected to AD). So I logged in to the server to run the following delete command directly.
Samba DNS entry deletion commands:
Example
Command Form
Interestingly, when deleting the wap.homenet object the homenet object that remained was tranformed from an OU into an end node.
LDAP is composed primarily of objects, and secondarily by the relationship of objects to one another and to other LDAP directories.
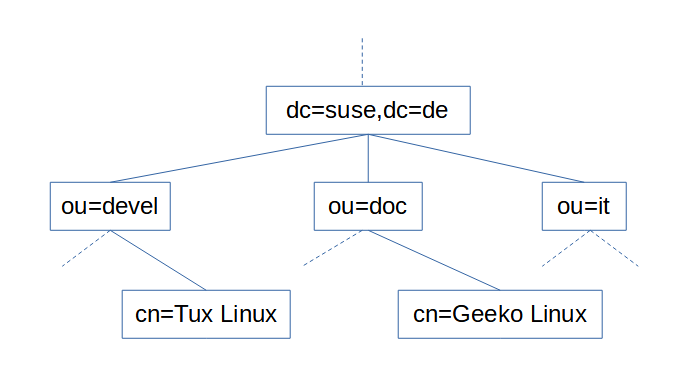
LDAP is organized into a scheme or possibly several schema. A scheme is a defined hierarchy of objects and collections of objects. While schema can be user defined, the majority of installations utilize a standard scheme, one which can be considered a convention. The simplest and most widely used would be Active Directory. This scheme uses 3 primary objects categories:
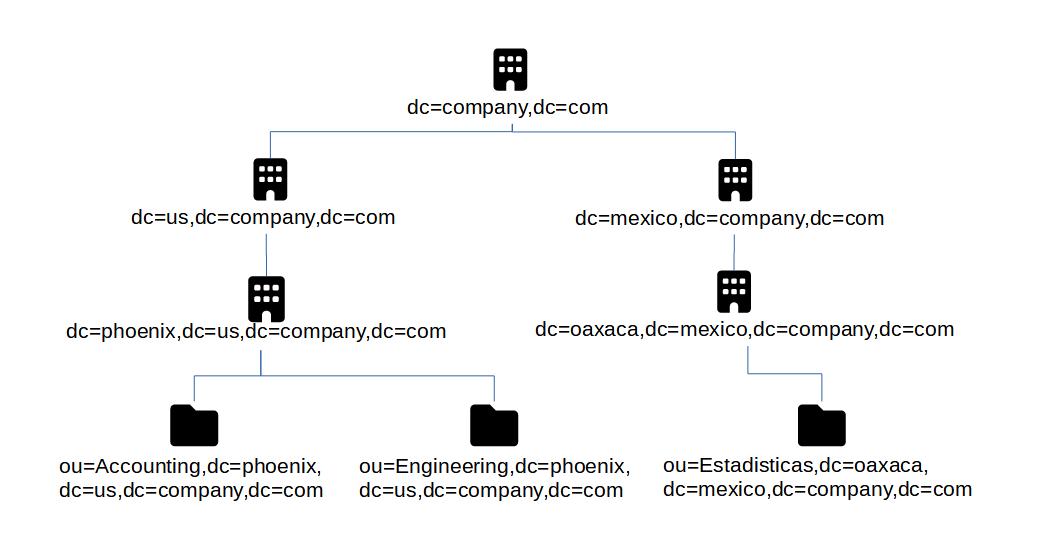
A listing of names for an object that include the entire path to the root of the LDAP namespace. Users are one of the most used Common Name objects. For example, user Tom Jones, and assuming company.com as the domain, then the Distinguished Name for Tom would be: cn=Tom Jones,ou=Users,dc=company,dc=com
The order of a distinguished name is important! It starts with the most granular element and proceeds to the most general
A partial DN, even if it is just the object name on its own. An RDN is thus meaningless without a reference to a location in the directory. It is also possible to cite the same RDN for two different objects; though no two objects may have the same DN.
cn=csantanacn=csantana,ou=UsersA typeful name includes components in the form <type>=<name>. For example: cn=Users. A typeless form may be supported by some applications, for example: Administrator, Users, company.com.
The hierarchy of LDAP is considered a tree, called the Directory Information Tree (DIT). The top and most generalized object is called root and is not actually represented by an object in the tree. It has no defined object class either. In AD the root object must come from the object class DomainDNS. Because AD uses DNS to structure its namespace, the DomainDNS object is given a DC designator. For example: dc=company,dc=com.
Directory Service Agents are servers that hold copies or segments of the information base. This means that the logical store of an LDAP implementation may have one or more DSAs. Of the several DSAs that may be part of one implementation, some can act as replica information bases, or as stores for only a segment of the overall implementation, e.g. if it is too large or cumbersome to host with a single DSA. Replica DSAs are handy for location diverse implementations.
Within DSAs are naming contexts. In AD a domain is a naming context. Since a domain controller can host more than one domain, a domain controller would be a DSA.
Naming Contexts are the boarderline between a local or foriegn object. Meaning “within” the same namespace as the object making the request, or “external” to the namespace of the object making the request. Domain/NC can ‘refer’ requests through trust relationships, if they exist, between domains. If the referred request is unknown to the DSA it is requested of, then it returns another referral. This is called walking the tree.
A service that manages client connections to the DSA and provides a very general structure of the DSA to the client so the client can make requests
This section serves as a bit of a catchall, for any other network services that form the backbone of the network, especially for connectivity purposes. This could include, for example: network cabling, switches, firewalls, and network design philosophies. Core Network Services is the parent to this section, but is defined as services that enable application services (application services being things like web servers, game servers, file servers…). In this light Network Connectivity is viewed as an enabling service - what application services could function without the actual network connectivity underlying them?
This article discusses the thought process behind a design philosophy I’ve adopted to achieve server network isolation. There are certainly drawbacks and alternatives to the method I outline here, though many alternatives are only available with enterprise hardware or software. Consider what I have to say but use your own judgement if you decide to implement.
So you’re running several servers, each of which needs network access (probably just for internet access). The simplest way to connect them all is a flat network; one VLAN, one subnet. This is certainly the natural way that a homelab network would start out. But as we learn more and better security practices, and about the threats that these practices help guard against, a flat network seems less and less the proper solution.
The concept of a “flat” or “trusted network” should be abandoned in favor of “zero trust” designs that isolate individual services or related collections of services away from all other network traffic.
The typical hosted service will likely need access to the internet, as well as other facilitation services you run (identity, DNS, DHCP…), but access to the other application services you host is not something that it needs. Since that’s the case, why allow it? Placing all services in a flat network allows direct communication between servers, without filtering by a firewall or other security system. This can lead to disaster.
Our security efforts aim to deal with the eventuality of getting hacked. Securing an individual server takes different measures than securing the rest of your network from a compromised server. If we were to describe a general outline of how a hack takes over a network the first step would be gaining a foothold by compromising a single server, then the hacker looks for other servers in the network “neighborhood” that they can also compromise. Once they have their foothold they are “inside” the trusted network, making it easier to discover vulnerable services to exploit on neighboring servers. This is because direct communication is possible on a trusted network, completely bypassing the secrutiy of a firewall. Modern servers provide a large list of default or standard services - the security reality is that some number of unpatched vulnerabilities are likely to exist on each server through one of the services it provides. Our best strategy is to force all network traffic to be inspected by the firewall, and prevent servers from communicating directly by isolating them.
Though VLANs are the usual go-to solution for isolation, there is an alternative that can be considered: subnets. Two hosts on the same VLAN that have distinct subnet definitions will not directly communicate. A host that needs to communicate with an IP address outside of its defined subnet will send the traffic to its configured default gateway, which is the firewall in our case.
BAM! Done! Isolation! But wait - what if one of these servers is compromised? We must assume that an attacker would have complete control over the server they have compromised, which would include network configuration / subnet configuration. This means they could easily set a subnet definition that let’s them communicate directly to other servers without sending the traffic to the default gateway (firewall). Thus a major weakness of relying on just subnet definitions for isolation is how the server is “voluntarily” isolating. However it is true that not all security is lost if this happens; a compromised server with expanded subnet definition that communicates to a non-compromised server won’t see any communication return from the non-compromised server. The non-compromised server would receive traffic from an IP outside its subnet, so if it wanted to reply it would send the traffic to its default gateway, because the IP of the compromised server is still outside its subnet as far as it is concerned. But we should still be concerned that the compromised server can send traffic directly to any other server, just in case this might still allow vulnerable services to be compromised. As we can see, additional separation controls are needed.
Another major drawback to creating a whole separate subnet for each server you host is IP wastage. Subnets can be designed to be as small as two IP addresses (two non-useable IP addresses, as in a /31 subnet, but realistically a subnet of /30 with two useable IP addresses and two non-useable IP addresses). Because of how IPv4 subnets are required to be defined there is additional wastage because of network and broadcast IP addresses. These appear as the first and last IPs in the subnet respectively. This means that a subnet defined to connect a single server eats up a total of 4 IPv4 addresses (two unuseable, one for the server, one for the default gateway/firewall)! However, even limiting ourselves to Class C private IP address space we’re still not likely to run out of subnets of this size in a homelab environment. If we ever do feel the walls closing in on us, there’s always IPv6 to save the day.
The topic of network isolation typically starts with a look into VLANs, so why don’t we consider them now. VLANs force traffic separation within the network and without clients or servers needing to apply a configuration. This seems to be an effective way to accomplish server isolation and addresses the shortcommings of subnet isolation. Perhaps separating servers each into their own VLAN is all that is needed?
As we work to implement individual VLANs per server we must add these VLANs to our firewall as well. This is when we discover that the firewall wants a unique subnet definition per VLAN. So we’re back to using subnet isolation too. However this makes a two-pronged approach: isolating servers using host-based network configuration (subnets) as well as network-based configuration (VLANs).
Let’s also consider a real-world scenario, where a host is running the Docker engine with several containers in a flat subnet that contains other full virtual machines and services running on traditional physical servers. The Docker containers are all configured to use standard Docker bridge networking with ports published on the Docker host for service connectivity back to the network.
One large advantage of container architechure is data processing isolation and network isolation. Even though each container runs directly on the host running the Docker engine, the processes are isolated so that they can only access the resources explicitly configured for them. A service running in one container should not be aware of services in other containers, including through network connections (even Docker network connections). But services wouldn’t be very useful without network connectivity, which is allowed by publishing the service’s ports through the Docker engine.
Even with the protections each container enjoys, are they truly isolated from each other server on the network? Unfortunately, no. There are other virtual and physical servers on the same subnet as the Docker host. Just as before all it takes is a malicious actor gaining a foothold on any virtual, physical, or containerized service and then he would be able to pivot to any other server in the subnet (not container to container, but container to virtual/physical or virtual/physical to container).
To mitigate the issue it is a best practice to isolate the Docker host in its own VLAN and subnet. But then why stop there? Why not isolate each server, each container? It’s easy to facilitate this using MACvlan Docker networks (see more about it in my article discussing Docker network types). In short, Docker containers using MACvlan type connections appear as traditional servers to the network, allowing our network security measures (subnets and VLANs) to apply.
A homelab is far from a commercial datacenter, even though both operate on similar concepts that differ mostly in scale. But let us consider the datacenter for a moment. How might a datacenter solve the problem of server isolation, especially with disparate tenants hosting servers side-by-side; mixing physical, virtual, and containerized deployments? The datacenter would likely feel the constraints of IPv4 waste from separate subnets much faster than a homelab, so that may not be a good solution any longer (though IPv6 would still probably resolve this issue). What else can be done?
Available in enterprise grade switch hardware, Private VLANs offer a way to keep traffic from disparate servers isolated, at least until it reaches the edge of the subnet. Private VLANs operate cheifly on two VLAN IDs: the promiscuous VLAN and the private VLAN. A relationship between the VLANs is recorded in the switch, so that the switch can pass traffic between the VLANs using the following rule: traffic received on a private VLAN port may only exit through a related promiscuous VLAN port, traffic from a promiscuous port may exit any related private port. This arrangement specifically prohibits traffic from a private port to exit through another private port. Servers are connected using private ports while firewalls/gateways are on promiscuous ports, thus forcing servers to only communicate with the firewall while the firewall can still communicate with any server.
The downside here is the cost of enterprise grade equipment. Considering that, I’ve never been able to try out private VLANs in a homelab, but if I had the opportunity I’d like to confirm a suspicion… what happens if two servers are connected to a switch using private VLAN configuration, but then that switch is connected upstream to a switch that is not configured with private VLAN? My suspicion is that the upstream switch would receive packets from devices on the downstream switch that were destined for hosts in the same subnet that are also connected on the downstream switch. Doing its job as a switch, the upstream switch would forward the packets right back to the downstream switch without the packet ever being evaluated by the firewall. Thus a simple misconfiguration of private VLANs in the network as a whole would compromise the entire security design.
The PreeXecution Environment (PXE) provides supporting BIOS systems a source from which to receive a bootable image and/or configuration. Allows a system to boot from the network to an OS without an OS being installed on any local disk.
portions of this article used herein
Certainly Microsoft has its own flavor of PXE boot service, called Windows Deployment Server (WDS). They also provide free software for advanced Windows OS deployment, called Microsoft Deployment Toolkit (MDT). By using the configuration editor, called Deployment Workbench, you can design a “lite touch” deployment scenario for your Windows OS, including driver packages and 3rd party applications.
The limitation of MDT and Deployment Workbench is that they only run on Windows systems. However, the PXE bootable image it creates can be loaded into a Linux PXE server
First install the Windows host for MDT
CPU: 2x vCPU in 1 socket Mem: 8GB HDD1: 40GB #OS storage HDD2: 50GB #storage for deployment share IP: 192.168.1.15 hostname: deploy Admin: deployprojadmin PW: deployprojadmin OS: Windows 10
After the OS has been installed, install the appropriate version of the Windows ADK, selecting the following features:
Next install the Microsoft Deployment Toolkit (which is separate from what is included in the ADK)
Create a new deployment share in the secondary 50GB HDD. Setup of the MDT configuration is beyond the scope of this article - you’ll find some documentation for this in the previous link. However, to involve the PXE server we will need to generate a boot image from the MDT. To do this, right-click on the deployment share object in the left-hand navigation tree, in Deployment Workbench once you have it open. This will generate the first-time configuration and boot images, though with the deployment share being empty and unconfigured the boot images will need some tweaking before they are useful.
Back on the PXE server, bring over the boot image ISO and follow the steps in this article to mount the ISO and copy the boot files to the location the PXE server needs.
Add the following to your PXE config file
…then add a new section
Press [esc]:wq to save and quit
based on https://www.linuxtechi.com/configure-pxe-installation-server-centos-7/
A Linux-based PXE server has 3 configuration components (in addition to your OS installation image, of course):
In this build I lace together the services of a DHCP server (previously established on a separate server) and a TFTP server (new). Both based on CentOS 7.
Begin by installing CentOS to a new virtual machine (VM)
- Hostname: pxe
- IP: 192.168.1.14
- U: pxeprojadmin
- P: pxeprojadmin
Install the needed packages
TFTP (trivial file transport protocol) is controlled by xinetd, so it must be turned on in xinetd config
…then find the line ‘disable=yes’ and change to:
Press [esc]:wq to save and quit
Now the boot loader files need to be copied to the TFTP directory
Create the directory needed for the PXE boot configuration file
Download CentOS 7 installation ISO for later PXE distribution (to the current directory: /home/pxeprojadmin)
Mount the ISO so that contents can be copied
Copy the contents to the FTP public directory
Copy the Kernel files to the TFTP server
Clean up by unmounting the ISO
write the following
Enable and start your system services
Set SELinux to allow FTP access
Set firewalld to allow relevant services
Set DHCP options for the IP subnets you wish to access the PXE server. Here I’m assuming that you’re running a DHCP service in Linux, on the same or different service host.
In the subnet definition section of your file set the following options, with comment included to call out the PXE section
…then in the general options section of the DHCP config file, add these lines
Press [esc]:wq to save and quit
Restart the DHCP service
Now you should be able to access your PXE server connection when you boot a new computer/server/VM, using the PXE boot option of the available BIOS for your system.
I did not test this implementation, but the source article provided the following notes on setting a automation for the OS installation process
The kickstart file required a root password to complete the CentOS install (to set it for the root account in the installed OS). Since it will be stored in plain text in the kickstart file it is important to encrypt it. Here ‘Pxe@123#’ is the example root password. The command below outputs the encrypted password as string, which you substitute for [encrypted_root_pw] below
The default kickstart file is /root/anaconda-ks.cfg, which you could reference for options. Create a blank file
and write the following in it
Press [esc]:wq to save and quit
To enable the automation for a particular PXE option block, edit your PXE config file
and the following to your existing APPEND line
Press [esc]:wq to save and quit