Here I hope you will find a note, tutorial, or rambling that may help you on your own journey self-hosting a home lab.
The info I’ve recorded in these entries pertains to projects I’ve undertaken myself, mostly focused on data ownership and independance from 3rd party controlled services that may disappear on a whim (looking at you Google).
Projects of that sort that you’ll find record of here:
Host your own email server
Ditching Google Docs with Nextcloud
Plex movie server
Bitwarden password manager
As an IT professional (emphasis on system administration and server hosting experience), I have notes on backup and redundancy for services you host. The goals being: hosted on a home internet connection and a budget of moderate to as low as free
Subsections of Home
Containerization
Verb: embracing lightweight and isolated code execution environments by implementing software services in containers, popularly Docker containers
Subsections of Containerization
Building a Container Image
Containers are incredibly useful, even when just running images built by others. However you can make your own container image as your custom solution for anything you like. The key element is to write your own Dockerfile. As an example I will write a Dockerfile to run a Minecraft server below. As you’ll see, this can all be accomplished in very few lines of code.
Base Image: Alpine Linux
Container images need to be built on a base image. And as we’re most often hosting Docker on a Linux distribution, we need a Linux distro as the base of the image. The most common Linux distribution to use for containers is Alpine Linux, due to it’s small default footprint and performance tuning.
While Alpine Linux is great as a container base, it uses its own flavor of all of the basic utilities. For example, the package manager for Alpine is not apt or yum/dnf… it’s a utility called apk. Keep an eye out for the Alpine variations of commands that are noted on this site in order to use Alpine well.
Preparation
Since Dockerfile commands are more-or-less the same commands you would issue to a full installation of your chosen Linux distribution, completing a test installation to a full virtual machine first can be very helpful for figuring out the commands you need for your container image. Once you have the list of commands from the full virtual machine installation you are only left the much easier task of adapting those commands for use in your Dockerfile.
Creating the Example Service: Minecraft Server
It should be easier to understand the layout of the Dockerfile by stepping through the creation of an example. Let’s say that I was running my own Minecraft server on a traditional server or full virtual machine, but now wanted to run it in Docker instead (running it in Docker would confer the benefits of containerization: portability, faster service start up, easier management through division of the service into components, etc.) To prepare I am building a traditional virtual machine in order to record the commands needed to get the environment up and running. Since I intend to build the Docker image based on Alpine Linux (the most popular base for Docker images) I will also build my test virtual machine on Alpine.
Installing to a Full Virtual Machine
For anyone who wishes to run the Alpine install long-term, instead of the container, check out the Alpine installer configuration options I used
Build Values
Build the VM using the x86_64 build of the “Virtual” branch
Option
Value
VM Name
minecraft
ISO image
alpine-virt-3.17.3-x86_64.iso
Disk size (GB)
32
CPU Sockets
1
CPU Cores
2
CPU Type
host
Memory (MiB)
4096
Network
VLAN with DHCP and internet access
Firewall
disabled
After booting Alpine login with the username: root and no password requested. Run the command setup-alpine to begin setup.
Option
Value
Keyboard
us > us
Hostname
minecraft.domain.tld
Interface
eth0
IP Address
dhcp
Manual network
n
Password
root
Retype
root
Timezone
America/Denver
Proxy
none
Mirror
1
Setup a user?
no
Which SSH server?
openssh
Allow root ssh login?
yes
Enter SSH key
none
Which disk?
sda
How to use disk?
sys
Erase disk?
y
Then issue the reboot command to boot to the installed system
After completing the Alpine install on a fresh virtual machine I issued the following commands to install a Minecraft server:
Enable the Alpine community repository in order to obtain the Java Runtime Environment (JRE) in a later command
vi /etc/apk/repositories
# uncomment the community repository for Alpine v3.17# save and quitapk update
Alpine Linux does not come pre-installed with a firewall or network traffic manager. The preferred solution is to install iptables and set it to start automatically, then define the traffic rule, as below. Minecraft server utilizes TCP port 25565.
rc-update add iptables
iptables -A INPUT -p tcp --dport 25565 -j ACCEPT
/etc/init.d/iptables save
Finally we’re ready to launch the Minecraft server, through a Java launcher running in a tmux session. The Xms option defines the minimum memory to allocate to the Java virtual machine, and Xmx defines the max that it will ramp up to. tmux is used in place of the common Linux command screen, which is not being supported as broadly anymore. tmux allows a program to run in a detachable shell session, which is especially handy for programs like Minecraft server that do not exit after running (they continue to run continuously) and can accept commands from the command line while they still run in the background. In other words, if Minecraft was coded to run in the background on its own and accept commands through a utility program, tmux wouldn’t be needed.
tmux new java -Xms1G -Xmx2G -jar server.jar nogui
Note
Use the keyboard combination CtrlbSpaced to breakout of the tmux session (detach it). Use the command tmux attach-session to reattach to the last running tmux session. Use CtrlbSpace? while in a session to list commands.
Coding the Dockerfile
The Dockerfile should be formatted in Unix EOL format, which is easiest to achieve by using a program like Notepad++. You can find the setting for the Unix EOL under the menu Edit > EOL Conversion > Unix (LF).
Create a file called Dockerfile with no file extension. It should be filled with the following lines:
Use the Alpine 3.17.3 base image (or latest version of Alpine). Base images are already hosted in the Docker repository
FROM alpine:3.17.3
Set environment variables. We’ll eventually use these environment variables when instantiating a container, on the command line or in a Docker Compose file. The values we set here are default values that may be overridden by the environment variable definitions we set later
ENV MAX_HEAP=2ENV MIN_HEAP=1ENV EULA=false
The RUN command causes a command to run during the image build process (not afterward, when the container is instantiating). The command here adds the Java JRE package from the Alpine repository. Interestingly, there is no need to enable the communitry repository this time, probably since the Docker Alpine base image already has it enabled
RUN apk add --no-cache openjdk17-jre-headless
As we’ll see in a subsequent step, it is best to download and include the Minecraft server.jar file along with your Dockerfile to build the image, instead of using wget to download it (notice that we did not install wget this time either). The next command puts a copy of the server.jar file into the built image, copied from the build source we will put together later on. I’m also collecting the server.jar file, and the others we create later on, in a new directory at the root of the container’s file system - a directory called “data”. If the directory we copy into doesn’t exist then the COPY command creates it. Including the trailing slash in the command below copies the file to the specified directory, rather than copying to the file system as a file with the new file name specified.
COPY server.jar /data/
The WORKDIR command changes the selected working directory within the image, during the build process and for build purposes only
WORKDIR /data
Lastly we come to the ENTRYPOINT command. This command records to the image any commands that an instantiated container should run when it starts up. Alternatively we could have used the CMD command, however there are important distinctions between these two commands:
CMD can be overridden by specifying a command when instantiating a container (during the Docker command call). ENTRYPOINT does not allow this.
There are two forms for both CMD and ENTRYPOINT: shell or exec. The preferred form is the exec form, which is shown below with square bracket notation and with each argument passed in a comma separated list. The shell form passes the command just as it is usually issued on a command line. The difference is how the shell form expands variables, and the exec form does not, unless you use the exec form to call the shell directly as is done below.
Every Dockerfile must have a CMD or ENTRYPOINT command
The variables in the command below are enclosed in curly braces due to the fact that the argument syntax requires a ‘G’ to follow the value that is passed in. The curly braces prevent an incorrect variable name match when the command line interpreter mistakenly includes the ‘G’ in the variable name.
The EULA environment variable can only be used if it is evaluated by the container after instantiation, rather than at build time. Since the only code from the Dockerfile that is evaluated in a running container is in the ENTRYPOINT then it makes sense to include the code to set the EULA file IN the ENTRYPOINT definition, along with everything else.
There is no need to run the java command behind a tmux command inside the container. This idea is useful in a full virtual machine so that the virtual machine can still be interacted with (for updates, administration, etc…) while the Minecraft server runs. If you need to do these same things for a container you would just stop it and update the image build, then relaunch the container. So tmux is no longer needed.
That’s the end of the Dockerfile, but there is another important component from the full virtual machine build that we have not used here - iptables. In the Docker Compose definition we will create later we will define port mappings through the Docker API. Docker will impose these port mappings on the running container using iptables on its own. So we don’t need to add iptables ourselves.
Expand here to see the full Dockerfile, all together this time
Docker file
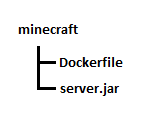
While you could certainly construct your Dockerfile to not require accompanying source files, my end goal is to upload the bundle as a .tar file to the image build section in my Portainer Docker management system. In order for me to get a successful build I need to create a directory on my admin machine and place the Dockerfile and the Minecraft server.jar (obtained from Minecraft Server Download) in the top level of the directory, then create a .tar file where these files are at the top level of the .tar file. You can create a .tar file with the 7zip archiving program. When selecting the files to include, multi-select the Dockerfile and the server.jar files and then have 7zip create the .tar - don’t tar the directory or else this will cause a directory to exist at the top level of the .tar file.
Next we upload to Portainer and build the image. I named my image minecraft:custom, which will be referenced in the Docker Compose
Docker Compose / Docker Stack Definition
The final step is to create a Docker Compose for your image to be launched from. In Portainer this is done by creating a Stack. However, before we create the stack we should create a Docker volume and network
Docker volume and network definition
The volume definition is trivial as you only need the default options. You can set the name of the Docker volume to minecraftdata.
Your network definition will depend on your network setup. In my case I will need to define a new VLAN with specific rules in my firewall, tag this through my switch and hypervisor down to my Docker host, and then into a new Docker network definition. Alternatively you can use the port mapping that I show below and simply point your Minecraft client at the IP address of your Docker host (not recommended for production deployments as this can carry security concerns).
Docker compose and stack definition
The elements of a Docker compose definition are discussed elsewhere on this site, so I will cut to the chase of the full compose definition below:
Launch this definition and you will see the container start and run, and then with a few more minutes’ time the Minecraft server will be available at the IP address of your Docker host. With the Docker volume in place, even if you take down the running container and start it again, the server will still load the server data and the save. Without the Docker volume a restart of the container will lose all game progress and start a new world.
In my Docker environment I make use of a few Docker Swarm features and also run Swarm on my single Docker host in preparation so I could add more Docker hosts to the swarm in future. Of the various Docker network types the basic ones are: Bridge and Overlay. Bridge is scoped for use on an individual Docker host (not swarm-aware), while Overlay is swarm-aware.
Docker Network Types
Each type of network is enabled through use of a specific driver, so Docker network types are also referred to as Docker network drivers. Docker provides an excellent summary of each driver on their documentation page (linked above), so I’ll just say what they’ve said. The ones that I typically use are in bold:
Bridge: the “default” network type that is good for running most containers, or containers that don’t require special networking capabilities. User-defined bridge networks enable containers on the same Docker host to communicate with each other (network is not swarm-aware). Bridge networks are isolated networks such that all containers attached to it can communicate with each other - useful when needing a common network for all containers in the same “project”. Bridge networks are isolated from the host and require specific port mappings to be “exposed / published”.
Host: shares the host’s network with the container. When you use this driver the container’s network isn’t isolated from the host.
Overlay: best when you need containers running on different Docker hosts to communicate with each other. Like a Bridge network, but swarm-aware so that swarm services can automatically share the network configuration to all Docker hosts in the swarm. Overlay networks are isolated from their hosts, so they require specific port mappings to be “exposed / published”.
MACvlan: good for migrating from a traditional VM environment or when you need your containers to appear like physical hosts on the network. This network type, and the IPvlan type, allows your containers to gain direct access to the network and be managed by traditional network security tools (like firewalls).
IPvlan: similar to the MACvlan type but doesn’t assign a unique MAC address to each container. Use this type if there is a restriction on the number of MAC addresses you can assign to a network interface or port on your Docker host (the restriction would likely come from the Docker host’s underlying OS).
none: completely isolate a container from the host and other containers. Containers with this network type are not meant to have any network communication, so publishing ports to expose services does not work. This type of network is not available when running a container on a Docker Swarm.
Preference for Docker MACvlan Network Type
In my homelab environment I am the administrator for every aspect of service delivery, including system administration and network administration. Network firewalls are still a recommended security technology for all types of networks, and I certainly run one myself and recommend it for any homelab network. Modern firewalls provide many services useful to a homelab network, not least of which is a firewall’s primary function - the list of traffic forwarding rules. Since firewall rules are still based on where traffic came from and which interface, IP address, or port that it wants to go to, managing network traffic destined for containers can become messy with each container using the Docker host’s IP address. Using MACvlan networks to make containers “first class citizens” on the network means firewall management becomes more organized. Each Docker MACvlan network is its own VLAN and thus is a separate interface in the firewall, which simply enhances the organization of firewall rules. There are security considerations as well, especially for environments where traditional VMs and containers operate side-by-side.
For a more complete discussion of network security practices for Docker MACvlan containers and subnet separation, please see my article (Network Security Through Subnet Separation) on the topic
Hugo Docker Image
Hugo is a popular open-source static site generator. A static site generator creates flat HTML files rather than relying on dynamic content like Javascript. Static sites typically have a smaller storage requirement and are more performant than dynamic websites, though they also have a much reduced feature set. However most people would say a site that supports full dynamic content that is used just for article content (like this site) would be a waste.
There are a fair few Hugo Docker images out there, but I decided to make my own to practice Dockerfile creation and to fully understand the image that I end up running. Please see my article regarding building a Docker image for the first time as a prerequisite to this build.
TAR file build-out
In addition to the Dockerfile for the .tar file I’ll be creating I also need to include several other files:
entrypoint.sh file contents detailed herein; script for container start
nginx.conf file contents detailed herein; main configuration options for Nginx webserver
net.redbarrel.knowhow.conf specific Nginx config for the site
SSH server is also installed so that the site contents can be managed by the administrator. Tips on defining content for a blog site in Hugo is covered in another article.
Dockerfile
FROM alpine:3.17.3
ENV SSHUSER=ENV SSHPASSWORD=RUN apk add --update --no-cache \
git \
gcompat \
libc6-compat \
libstdc++ \
nginx \
openssh
RUN echo 'PasswordAuthentication yes' >> /etc/ssh/sshd.config
RUN ln -s /lib/libc.so.6 /usr/lib/libresolv.so.2
RUN mkdir /etc/nginx/sites-available /etc/nginx/sites-enabled
COPY nginx.conf /etc/nginx/
COPY net.redbarrel.knowhow.conf /etc/nginx/sites-available/
RUN ln -s /etc/nginx/sites-available/net.redbarrel.knowhow.conf /etc/nginx/sites-enabled/net.redbarrel.knowhow.conf
COPY hugo /usr/local/bin/
RUN chmod +x /usr/local/bin/hugo
COPY hugo-cron /etc/cron.d/hugo-cron
RUN chmod +x /etc/cron.d/hugo-cron
RUN crontab /etc/cron.d/hugo-cron
RUN touch /var/log/cron.log
COPY entrypoint.sh /
WORKDIR /srv
ENTRYPOINT ["/entrypoint.sh"]
While other methods are provided in the offical documentation (see above), I prefer adding the offical Docker repository to my package manager as my source for Docker packages.
Even though the repo URL used above references ‘centos’ these packages are suitable for Red Hat-family OS’s. Fedora and RHEL have their own URLs, so you can use those for Fedora and Red Hat respectively as you wish (see the documentation).
In the past Docker Compose would need to be installed from a separate Github project, but these days the enhancement is added with the docker-compose-plugin package. Nice!
Enable the Docker system service and start it
systemctl enable --now docker
Portainer Management of Docker
Portainer offers an excellent management webgui for your Docker host. Simply run the Portainer Docker Compose project to get it going. See my article Installing Portainer to get the steps.
Considerations for Hosting Docker
When considering my designs for hosting services in containerized or virtualized infrastructure I realized that I could reduce all services to containers and then just run docker engine directly on my server farm (an environment with 100% containers, 0% VMs). In the end I chose to install a VM hypervisor directly on the servers instead (ProxMox VE), with docker installed as a virtual machine. This allowed me the flexibility to run full virtual machines from time to time, while most of my services would be containers on Docker. ProxMox has compatibility to run LXC containers directly, but not Docker containers; I enabled Docker containers by running my Docker engine inside a full virtual machine under ProxMox.
Initially I had concerns about how performance would turn out, but for the workloads I run in my homelab this hasn’t been a real concern. For the type and quantity of services run in a home lab I don’t have any problem recommending this setup.
A vanilla installation of Docker can be entirely managed through Docker’s command line tools, however graphical tools like Portainer offer a GUI representation of commands and are preferred by some administrators. Portainer’s GUI is a webgui, providing the additional benefit of managing your Docker installation through a web browser instead of a locally installed app.
Portainer is offered in a free community-support-only edition (Portainer CE) and an edition for business with paid tiers and direct support (Portainer BE). The business edition includes features that aren’t available in the community edition, though these features are typically of interest for business computing environments, including: tying to centralized access management systems, additional security and reporting, and auditing features. All editions of Portainer also support Docker Swarm, Kubernetes, and Azure ACI.
Installation
Portainer can be run with a one-line Docker command, however since I like to launch Portainer without needing to remember all the options, using a Docker Compose file is much better. This also allows me to add comments (like the previous image version of Portainer that I had running before I did an update) and provides a visually organized layout for the options I use.
Prerequisites
Docker Volume: I created a persistent volume to hold the data that Portainer uses to run, including the database it creates. If you’re starting from a fresh Docker or Portainer installation then you’ll need to create the Docker volume first; for all other runs of Portainer you’ll be referencing your previously created persistent volume.
docker volume create: replace portainer_data with whatever name you want for the volume, but be sure to continue replacing it in upcoming commands as well
docker volume create portainer_data
Docker Network: I prefer to keep network traffic for each container separated all the way through the network to the external firewall. In order to do this, separate Docker networks are created and VLAN tags specified. The Portainer container is also isolated into its own VLAN, so if you follow this same network design and you’re starting fresh you’ll need the following command. If you prefer standard Docker networking, where each container is connected to the network by specifing a port on the Docker host to expose, then you can skip this step (however my commands do not include the options for exposing docker host ports - see official Docker documentation here and official Portainer documentation here).
docker network create: be sure to set your own values for subnet, gateway, and parent (which should be the name of your network adapter that connects the docker host with your VLAN). portainer_network should be whatever name you want docker to know the network as.
See my short discussion on my preference for macvlan Docker networks when separating containers into externally routed VLANs here. TL;DR it enables secure isolation of containers when managing through an external firewall
Certificate: I also wanted the Portainer webgui to use proper HTTPS, however I’m not serving the webgui to the internet and can’t (and don’t want to) pull a LetsEncrypt certificate. A self-signed certificate would still throw an error in my browser (unless I also installed the certificate to my workstation), but I have a better solution since I run my own local certificate authority - i.e. generate my own server certificate and install the root certificate from my local CA. This is why you see options to include Portainer’s SSL certificate shown in the compose yaml below. Don’t forget to create and upload your certificate and key files to the Docker host! - put them in a folder named ssl/ in the directory where you have your Portainer docker-compose.yml file.
HTTPS: Lastly, to enable use of the certificates previously mentioned and turn on HTTPS the ’entrypoint’ section is added to the Portainer compose file. This line disables serving Portainer on HTTP while specifying the HTTPS port as 443 (Portainer’s default is port 9443).
This section assumes that you have Docker Compose available in your Docker host somehow. Contemporary Docker installation can include a native plugin to enable Docker Compose - in the past this would have required obtaining the source and running Docker Compose separately. See my article for Installing Docker to see how I add Docker Compose.
Once you have Docker Compose available make sure your current directory is the one containing your Portainer Docker Compose yaml file (docker-compose.yml), and your SSL directory containing your certificate and key inside.
Starting Portainer
docker-compose up -d
Stopping Portainer
docker-compose down
Kubernetes Introduction: Docker vs Containerd
Kubernetes (also written as k8s) is an advanced container management and orchestration platform. It sits above the container management engine, which provides command interfaces for running containers and managing them. Docker is one example of a container management engine; Containerd is another. In fact, Docker is more of a hybrid, providing enhancements and programming interface to the Containerd engine it actually uses under the hood. As k8s sits above Containerd and Docker, it is required to install a container management engine when installing k8s.
In the past Docker directly developed a shim that would interface between itself and k8s, but has since ceased development on it. This produced blog posts announcing that k8s could no longer support Docker. However, development for the shim was picked up by Mirantis. It can found hosted on Github: cri-dockerd
Re-adding Utilities to Minimal Containers
Docker images are purposefully minimal and notoriously omit standard utilities an administrator would need during troubleshooting. See below for reminders of package names to use for reinstalling these utilities
Multiplexing of computing service environments on hardware that is managed by a hypervisor. Virtual machines allow an economical way to run traditional applications and services, without the need for hardware to be dedicated to each application or service. A single hardware server may have hosted a dozen applications at once in the past (at the risk of the applications interacting poorly with each other - due to existing in the same computing environment), whereas a hypervisor server could host several dozen applications, in separate compute environments eliminating the risk of unexpected interactions.
Subsections of Virtual Machines
Hypervisor Comparison
The following list of popular hypervisor software includes a short description and comparison of features. Any recommendations noted are from the perspective of someone wanting to host a homelab, so priority is given to the availability of a full feature set at no cost.
Xen Hypervisor
XenServer / Citrix Hypervisor
XenServer has a storied past. The commercial product is currently offered by the XenServer company. The free version is their “Trial Edition”, which only has the limitation of no support and smaller pool sizes (similar to free versions of XenServer offered in the past). Although I haven’t investigated this today, my experience in the past is likely to still be true, that you will probably need to sign up for a free account in order to download XenServer.
In the past the Xen hypervisor has been offered through several different sources, with most changes happening because the governance of an offering changed from open to closed source, or vice versa. Xen was offered as an open source community-driven project from its early days, with a company (XenSource) developed to offer support and a commercial product. Citrix had a product for app virtualization around this time, but no bare-metal hypervisor, and ended up acquiring XenSource to fill that gap. Citrix began offering the product as XenServer, but then forked the source in 2018 and changed the product name to Citrix Hypervisor for version 8. In 2022 Citrix was acquired by Vista and Evergreen, and the hypervisor product was spun off into a standalone business unit, now called XenServer again.
The Xen Hypervisor started out as an open source community-driven project, and that open source community project is still maintained by the Xen Project community at https://xenproject.org. They are primarily focused on the hypervisor elements, and an API. The Xen hypervisor can be installed manually on supported Linux distributions, however it is much easier, and I recommend, installing the XCP-ng distribution which bundles Xen in a custom Linux distribution (loosely based on CentOS 7). Installing XCP-ng is a similar experience similar in ease to installing VMware ESXi.
The XCP-ng Wikipedia article clairifies some history about XCP/XCP-ng. It seems that after Citrix acquired XenSource in 2007 and continued to sell the XenServer product, they decided to move XenServer to closed source in 2010. This prompted the creation of the XCP version of Xen Hypervisor, maintained by an open source community. However, Citrix took the XenServer code open source again in 2013, prompting XCP to abandon their now redundant efforts. But then in 2018 XenServer was again closed-sourced (with the branding change to Citrix Hypervisor), so XCP-ng was born as the successor to XCP. XCP-ng continues to offer an open source version of Xen Hypervisor bundled in a Linux distribution. XCP-ng also offers several other projects: Xen Orchestra, XOSTOR, XO Lite, XCP-ng Center. XCP-ng partners closely with Vates to offer commercial support services for XCP-ng through https://xcp-ng.com.
Recommendation
The Xen Hypervisor is a fine system for running virtual machines, and has compatibility to run Windows OS’s too. Xen offered an easier and all-GUI experience when I was directly attaching external harddrives for passthrough into VMs, but had no support for private VLANs (which I researched for a period, but never implemented). In the end XCP-ng is fine to run a homelab, especially with their Xen Orchestra web gui. I ended up choosing ProxMox, but if that ever stopped working for me then I would return to XCP-ng.
Proxmox
A KVM-based hypervisor, Proxmox provides management through a comprehensive webgui. Based in Germany, Proxmox Server Solutions GmbH provides commercial solutions and support. Even though Proxmox does not mention a free or trial tier in their pricing tables, their docs include information for running Proxmox without a subscription. This only provides access to the no-subscription repository, instead of the enterprise repository, however I ran my homelab on the no-subscription repository for years without any issues. Handily Proxmox does not gate any features behind subscriptions, so you can run Proxmox without a subscription and still have an unlimited number of clusers and cluster members, among all other features. Support with no subscription is limited to their community forums of course.
Recommendation
Proxmox is my first choice for homelab hypervisor. It does not have native support for Docker containers, however it does natively support LXE Linux-native containers. This hasn’t proved to be a serious obstacle, since I run Docker containers from a full-size VM hosted on Proxmox.
One difficulty I found getting Proxmox working was passing through a Link Aggregation Group (LAG) from my switch (or NIC teaming) to the Proxmox server. With a bit of searching on the Proxmox forums I found commands to run in the server terminal that got the job done, however in Xen or VMware the process could have been handled through the GUI.
VMware / ESXi
Until recently VMware was my recommendation for enterprise hypervisor environments. The licensing has always been the most expensive of all commercial environments, and some IT professionals have told me VMware is too complicated to learn, however I found that VMware’s GUI tools were comprehensive which made administration easier than I’ve experienced anywhere else. This includes GUI tools for hyperconverged infrastructure and clustering.
Unfortunately, after the completion of Broadcom’s acquisition of VMware, the licensing model became much more disadvantageous for VWware customers. Perpetual licensing was removed in favor of subscriptions, and free or trial offerings disappeared. I see many news articles and forum posts indicating that companies are looking to move to other hypervisor providers, based on the changes to VMware’s terms.
Even if there wasn’t the Broadcom acquisition playing up, I still couldn’t recommend VMware as a homelab hypervisor. There are no, and never were any, free or trial offerings that could sustain a homelab for the long term. It is unfortunate when enterprise technology providers do not offer a way for technologists to practice using their software, including practice for keeping a long-term environment up and running. I would honestly tell my employers that I am more comfortable setting up a Proxmox or Xen system than VMware (if I hadn’t been employeed with a company already using VMware).
Microsoft Hyper-V
I’ve had somewhat little experience with Hyper-V until I recently helped my company stand up a cluster of Hyper-V VMs. Previously I only experienced Hyper-V if I wanted to run a VM on my home Windows client OS. And of course those VMs were typically short-lived and did not need a complex network or storage setup, and I typically ran just a few VMs at a time.
Now that I’ve experienced setting up a production cluster of Hyper-V servers for an enterprise I can say that I do not recommend Hyper-V, unless the IT administrator is shackled to choosing only from Microsoft products when designing the solution. In any case it is certainly not a great solution for homelab, though it would be possible to run Microsoft Server OS and Hyper-V in a homelab through some type of trial or educational program.
If you are tasked with setting up a Hyper-V server cluster (hyperconverged even), then I offer this advice: be aware that Hyper-V does not support failover clustering on its own. Hyper-V servers can be connected through the same Hyper-V management client and this permits VMs to be moved between servers while offline, but this is not the “live migration” that we all expect from enterprise hypervisors these days. In order to acheive this you will need to learn about and setup Windows Server Failover Clustering, which is a separate server role outside of Hyper-V. For hyperconverged storage you will need to setup Storage Spaces Direct, again separately and outside of Hyper-V. Lastly when this is all setup, the Hyper-V management client will still not recognize the server cluster - so you will deploy the VM direcly in the Failover Cluster Manager console, “outside” of Hyper-V. My recommendation is to research several documents online before taking on the project - Microsoft does not offer the administrator handy cluster or HCI setup workflows like VMware or others do.
ProxMox VE
A KVM-based hypervisor, Proxmox provides management through a comprehensive webgui. Based in Germany, Proxmox Server Solutions GmbH provides commercial solutions and support. Even though Proxmox does not mention a free or trial tier in their pricing tables, their docs include information for running Proxmox without a subscription. This only provides access to the no-subscription repository, instead of the enterprise repository, however I ran my homelab on the no-subscription repository for years without any issues. Handily Proxmox does not gate any features behind subscriptions, so you can run Proxmox without a subscription and still have an unlimited number of clusers and cluster members, among all other features. Support with no subscription is limited to their community forums of course.
Hyper-V
Microsoft’s hypervisor, available with Windows 10 (Pro, Enterprise, and Education) and with all editions Windows Server 2016 or older.
A large advantage of this hypervisor is how it comes available with Windows, requiring no additional software or licensing. However competing virtualization platforms are typically chosen over Hyper-V for commercial applications, though Hyper-V does have numerous commercial deployments. Most certain a version of Hyper-V is used to power the Azure cloud.
Subsections of Hyper-V
Sizing the Console in Hyper-V
When deploying a virtual guest in Hyper-V that offers no GUI (text console only) you may find that the default size of the terminal window is quite small. You can address this through the boot options of your terminal (speaking to Linux OS here). In my case I’m using Ubuntu as example:
sudo vi /etc/default/grub
Find the line GRUB_CMDLINE_LINUX_DEFAULT="" where "" might be "quiet splash" instead. Add the following at the end of the line, inside the double quotes section:
video=hyperv_fb:800x600
Or use which ever resolution you need. Save and quit the text editor then update grub with:
sudo update-grub
After doing all this you’ll need to restart the VM to see the changes.
Core Network Services
LAN services are core to managed networks, providing:
identity
centralized policy
sometimes domain name services
Subsections of Core Network Services
Certificate Authority
Certificates are an integral part of service security, including within a LAN itself. Therefore it’s worthwhile for every managed network to include a certificate services server.
Subsections of Certificate Authority
Generating Certificate Signing Request on Linux
There are various Linux packages that provide commands for generating X.509 SSL certificates and requests, but one of the most prevalent is openssl. To generate a new certificate signing request, use the following command:
Linux samba tools are compatible with Microsoft Active Directory, and allow Linux client OS to attach to the AD domain, albeit with some limited functionality.
How to Set Static IP Address
Before joining to the domain, set your static IP address (or do so during setup, or leave DHCP enabled)
apk add networkmanager
rc-service networkmanager start
rc-update add networkmanager default
adduser <your username> plugdev #you will need to relog to apply the new group membershipnmtui
NIS is the traditional domain controller and identity service for Linux-only environments. It still works fine for this purpose today, but it is more limited than LDAP. It replicates the data in /etc/ from the group, hosts, mail, netgroup, networks, passwd, printcap, protocols, rpc, and service directories - out to all domain joined hosts in the network. These files comprise information that is also stored in LDAP when connected to Linux. However LDAP is also compatible with Windows where NIS has only limited Windows compatibilities.
LDAP is an extensible data framework, meaning that it can manage data for tasks that many not be explicitly defined by standard LDAP structures. That is to say, LDAP can be customized to store data for whatever purpose the network needs. Examples of LDAP data constructs are:
anything NIS does
mail routing
address book for mail clients
zone descriptions for BIND9
Samba authentication
Therefore, LDAP is generally preferred over NIS when supported, and especially in heterogeneous environments. Even Linux-only environments may prefer to deploy and LDAP directory, since LDAP has become so ubiquitous. This is also influenced by the Samba project(https://www.samba.org) which is the free and open source implementation of LDAP.
Working with Account Lockout in Samba 4/LDAP
Though samba-tool is a frequently referenced command when working with Samba directory services, it fails to provide more than the most frequently used functions for interacting with LDAP, such as: add user, delete user, set password, etc. A more detailed utility is pdbedit.
While trying to launch AD Users and Computers I found that my Administrator account would not connect the snap-in to my Samba server, which is usually and indication of account lockout (probably due to too many bad password attempts). You can use pdbedit to determine if a Samba account is locked out:
pdbedit -Lv #lists all LDAP accounts and attributes contained in the local serverpdbedit -v -u Administrator #lists all attributes for the Administrator account
Relevant attributes for Samba user accounts:
Unix username
user SID
logon time
logoff time
password last set
password can change
password must change (aka password expiration)
last bad password (last bad password attempt timestamp; 0 if none)
bad password count (resets with a good password attempt)
account flags:
D - account disabled
H - homedir required
L - account auto-locked (aka locked out)
N - password not required
U - normal user account
W - workstation trust account
X - password does not expire
Considering we are dealing with an account lockout, use the following command to unlock an account:
pdbedit -z <account name>
But that only resets the bad password count, so we must also reset the account flags with:
pdbedit -r -c "[]" <account name>
That will reset the account flags to [U ], but you can specify which flags to reset, for example with [N D H L X].
Info
In this case the trouble didn’t end up being account lockout… somehow my RSAT tools had become uninstalled on my local machine, so the fix was actually just to reinstall them 😑
Name Services
Name services or “Domain Name System (DNS)”, sometimes confusingly called “Directory Services”, refer to the network service(s) responsible for translating the names of domain objects into IP addresses. The idea being that even a small number of numerical IP addresses are difficult to remember, while a similar number of names (i.e. redbarrel.net) are easier for humans to deal with.
Subsections of Name Services
DNS Record Notation & samba-tool DNS Commands
DNS names are structured using . as delimiter between segments of the name, also describing the DNS hierarchy for that object.
Relative Distinguished Name (RDN)
A partial DN, even if it is just the object name on its own. An RDN is thus meaningless without a reference to a location in the directory. It is also possible to cite the same RDN for two different objects; though no two objects may have the same DN.
Examples of relative distinguished names:
cn=csantana
cn=csantana,ou=Users
Note
Due to the special meaning of the . I ended up finding extra “functionality” in the Microsoft Management Console (MMC) DNS client. I had been using this DNS client to manage my Samba domain and decided to create a new DNS entry for wap.homenet. Since the new object name included the . the DNS client treated it as a relative distinguished name and created an OU called homenet, under which it placed the wap object. I suppose I prefer this instead of having the DNS client simply give an error telling me that . is not allowed in object names. This functionality certainly can make creating new object OUs more streamlined.
Since I wasn’t expecting this I ended up trying to delete the OU in MMC DNS client, but was given the error that deletion wasn’t supported for this type of object. I guessed this was because my DNS server was based on Samba rather than Active Directory (with MMC DNS likely expecting to be connected to AD). So I logged in to the server to run the following delete command directly.
Samba DNS entry deletion commands:
Example
samba-tool dns delete localhost domain.tld domainnet A 192.168.1.50 -U administrator
Command Form
samba-tool dns delete <server-ip> <dnszone> <record> <A|AAA|PTR|CNAME|NS|MX|SRV|TXT> <data> [options]
Interestingly, when deleting the wap.homenet object the homenet object that remained was tranformed from an OU into an end node.
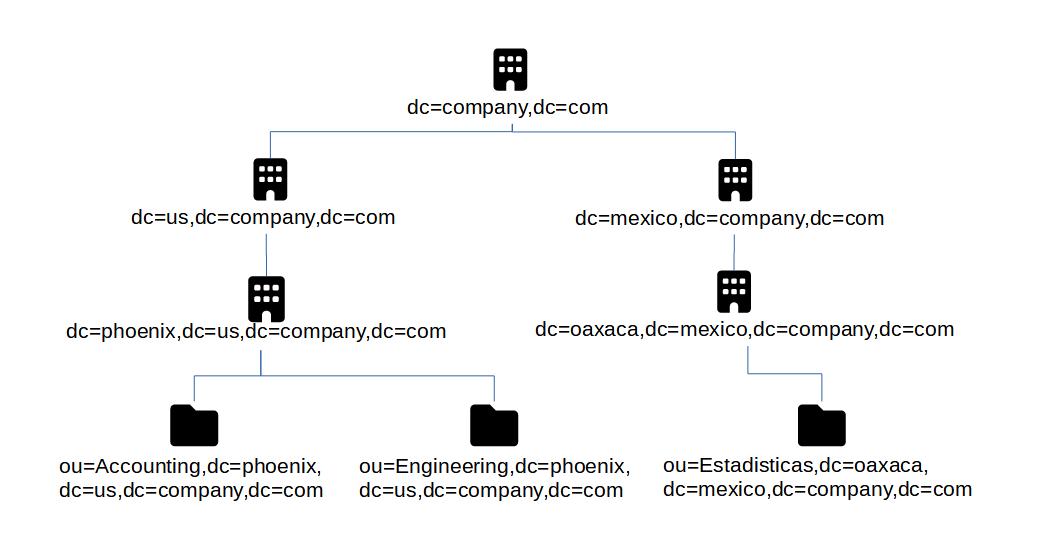
LDAP Structure Explained (Active Directory)
LDAP is composed primarily of objects, and secondarily by the relationship of objects to one another and to other LDAP directories.
LDAP is organized into a scheme or possibly several schema. A scheme is a defined hierarchy of objects and collections of objects. While schema can be user defined, the majority of installations utilize a standard scheme, one which can be considered a convention. The simplest and most widely used would be Active Directory. This scheme uses 3 primary objects categories:
Common Name (CN): These objects are end nodes, or leaves, which do not fall into either of the following object categories
Domain Component (DC): represents objects at the top of the hierarchical tree and are associated with DNS. Uses DNS do define this name space
Organizational Unit (OU): acts as a container to hold other objects. OUs are only meant to define logical areas or groupings of a particular domain or business use case, such as ‘Accounting’ or ‘Admin Office’
Distinguished Name (DN)
A listing of names for an object that include the entire path to the root of the LDAP namespace. Users are one of the most used Common Name objects. For example, user Tom Jones, and assuming company.com as the domain, then the Distinguished Name for Tom would be: cn=Tom Jones,ou=Users,dc=company,dc=com
Info
The order of a distinguished name is important! It starts with the most granular element and proceeds to the most general
Relative Distinguished Name (RDN)
A partial DN, even if it is just the object name on its own. An RDN is thus meaningless without a reference to a location in the directory. It is also possible to cite the same RDN for two different objects; though no two objects may have the same DN.
Examples of relative distinguished names:
cn=csantana
cn=csantana,ou=Users
Typeful Names
A typeful name includes components in the form <type>=<name>. For example: cn=Users. A typeless form may be supported by some applications, for example: Administrator, Users, company.com.
The hierarchy of LDAP is considered a tree, called the Directory Information Tree (DIT). The top and most generalized object is called root and is not actually represented by an object in the tree. It has no defined object class either. In AD the root object must come from the object class DomainDNS. Because AD uses DNS to structure its namespace, the DomainDNS object is given a DC designator. For example: dc=company,dc=com.
Directory Service Agent (DSA)
Directory Service Agents are servers that hold copies or segments of the information base. This means that the logical store of an LDAP implementation may have one or more DSAs. Of the several DSAs that may be part of one implementation, some can act as replica information bases, or as stores for only a segment of the overall implementation, e.g. if it is too large or cumbersome to host with a single DSA. Replica DSAs are handy for location diverse implementations.
Naming Context (NC)
Within DSAs are naming contexts. In AD a domain is a naming context. Since a domain controller can host more than one domain, a domain controller would be a DSA.
Naming Contexts are the boarderline between a local or foriegn object. Meaning “within” the same namespace as the object making the request, or “external” to the namespace of the object making the request. Domain/NC can ‘refer’ requests through trust relationships, if they exist, between domains. If the referred request is unknown to the DSA it is requested of, then it returns another referral. This is called walking the tree.
Root DSE
A service that manages client connections to the DSA and provides a very general structure of the DSA to the client so the client can make requests
Network Connectivity
This section serves as a bit of a catchall, for any other network services that form the backbone of the network, especially for connectivity purposes. This could include, for example: network cabling, switches, firewalls, and network design philosophies. Core Network Services is the parent to this section, but is defined as services that enable application services (application services being things like web servers, game servers, file servers…). In this light Network Connectivity is viewed as an enabling service - what application services could function without the actual network connectivity underlying them?
Subsections of Network Connectivity
Network Security Through Subnet Separation
Note
This article discusses the thought process behind a design philosophy I’ve adopted to achieve server network isolation. There are certainly drawbacks and alternatives to the method I outline here, though many alternatives are only available with enterprise hardware or software. Consider what I have to say but use your own judgement if you decide to implement.
So you’re running several servers, each of which needs network access (probably just for internet access). The simplest way to connect them all is a flat network; one VLAN, one subnet. This is certainly the natural way that a homelab network would start out. But as we learn more and better security practices, and about the threats that these practices help guard against, a flat network seems less and less the proper solution.
Zero Trust
The concept of a “flat” or “trusted network” should be abandoned in favor of “zero trust” designs that isolate individual services or related collections of services away from all other network traffic.
The typical hosted service will likely need access to the internet, as well as other facilitation services you run (identity, DNS, DHCP…), but access to the other application services you host is not something that it needs. Since that’s the case, why allow it? Placing all services in a flat network allows direct communication between servers, without filtering by a firewall or other security system. This can lead to disaster.
Tabletop Exercise: What if your network was compromised?
Our security efforts aim to deal with the eventuality of getting hacked. Securing an individual server takes different measures than securing the rest of your network from a compromised server. If we were to describe a general outline of how a hack takes over a network the first step would be gaining a foothold by compromising a single server, then the hacker looks for other servers in the network “neighborhood” that they can also compromise. Once they have their foothold they are “inside” the trusted network, making it easier to discover vulnerable services to exploit on neighboring servers. This is because direct communication is possible on a trusted network, completely bypassing the secrutiy of a firewall. Modern servers provide a large list of default or standard services - the security reality is that some number of unpatched vulnerabilities are likely to exist on each server through one of the services it provides. Our best strategy is to force all network traffic to be inspected by the firewall, and prevent servers from communicating directly by isolating them.
Subnet Separation
Though VLANs are the usual go-to solution for isolation, there is an alternative that can be considered: subnets. Two hosts on the same VLAN that have distinct subnet definitions will not directly communicate. A host that needs to communicate with an IP address outside of its defined subnet will send the traffic to its configured default gateway, which is the firewall in our case.
BAM! Done! Isolation! But wait - what if one of these servers is compromised? We must assume that an attacker would have complete control over the server they have compromised, which would include network configuration / subnet configuration. This means they could easily set a subnet definition that let’s them communicate directly to other servers without sending the traffic to the default gateway (firewall). Thus a major weakness of relying on just subnet definitions for isolation is how the server is “voluntarily” isolating. However it is true that not all security is lost if this happens; a compromised server with expanded subnet definition that communicates to a non-compromised server won’t see any communication return from the non-compromised server. The non-compromised server would receive traffic from an IP outside its subnet, so if it wanted to reply it would send the traffic to its default gateway, because the IP of the compromised server is still outside its subnet as far as it is concerned. But we should still be concerned that the compromised server can send traffic directly to any other server, just in case this might still allow vulnerable services to be compromised. As we can see, additional separation controls are needed.
Another major drawback to creating a whole separate subnet for each server you host is IP wastage. Subnets can be designed to be as small as two IP addresses (two non-useable IP addresses, as in a /31 subnet, but realistically a subnet of /30 with two useable IP addresses and two non-useable IP addresses). Because of how IPv4 subnets are required to be defined there is additional wastage because of network and broadcast IP addresses. These appear as the first and last IPs in the subnet respectively. This means that a subnet defined to connect a single server eats up a total of 4 IPv4 addresses (two unuseable, one for the server, one for the default gateway/firewall)! However, even limiting ourselves to Class C private IP address space we’re still not likely to run out of subnets of this size in a homelab environment. If we ever do feel the walls closing in on us, there’s always IPv6 to save the day.
VLANs
The topic of network isolation typically starts with a look into VLANs, so why don’t we consider them now. VLANs force traffic separation within the network and without clients or servers needing to apply a configuration. This seems to be an effective way to accomplish server isolation and addresses the shortcommings of subnet isolation. Perhaps separating servers each into their own VLAN is all that is needed?
As we work to implement individual VLANs per server we must add these VLANs to our firewall as well. This is when we discover that the firewall wants a unique subnet definition per VLAN. So we’re back to using subnet isolation too. However this makes a two-pronged approach: isolating servers using host-based network configuration (subnets) as well as network-based configuration (VLANs).
The Risk of Subnet Communication - Mixed Docker and Virtual Machine Networking
Let’s also consider a real-world scenario, where a host is running the Docker engine with several containers in a flat subnet that contains other full virtual machines and services running on traditional physical servers. The Docker containers are all configured to use standard Docker bridge networking with ports published on the Docker host for service connectivity back to the network.
One large advantage of container architechure is data processing isolation and network isolation. Even though each container runs directly on the host running the Docker engine, the processes are isolated so that they can only access the resources explicitly configured for them. A service running in one container should not be aware of services in other containers, including through network connections (even Docker network connections). But services wouldn’t be very useful without network connectivity, which is allowed by publishing the service’s ports through the Docker engine.
Even with the protections each container enjoys, are they truly isolated from each other server on the network? Unfortunately, no. There are other virtual and physical servers on the same subnet as the Docker host. Just as before all it takes is a malicious actor gaining a foothold on any virtual, physical, or containerized service and then he would be able to pivot to any other server in the subnet (not container to container, but container to virtual/physical or virtual/physical to container).
To mitigate the issue it is a best practice to isolate the Docker host in its own VLAN and subnet. But then why stop there? Why not isolate each server, each container? It’s easy to facilitate this using MACvlan Docker networks (see more about it in my article discussing Docker network types). In short, Docker containers using MACvlan type connections appear as traditional servers to the network, allowing our network security measures (subnets and VLANs) to apply.
Alternatives - Private VLANs
A homelab is far from a commercial datacenter, even though both operate on similar concepts that differ mostly in scale. But let us consider the datacenter for a moment. How might a datacenter solve the problem of server isolation, especially with disparate tenants hosting servers side-by-side; mixing physical, virtual, and containerized deployments? The datacenter would likely feel the constraints of IPv4 waste from separate subnets much faster than a homelab, so that may not be a good solution any longer (though IPv6 would still probably resolve this issue). What else can be done?
Available in enterprise grade switch hardware, Private VLANs offer a way to keep traffic from disparate servers isolated, at least until it reaches the edge of the subnet. Private VLANs operate cheifly on two VLAN IDs: the promiscuous VLAN and the private VLAN. A relationship between the VLANs is recorded in the switch, so that the switch can pass traffic between the VLANs using the following rule: traffic received on a private VLAN port may only exit through a related promiscuous VLAN port, traffic from a promiscuous port may exit any related private port. This arrangement specifically prohibits traffic from a private port to exit through another private port. Servers are connected using private ports while firewalls/gateways are on promiscuous ports, thus forcing servers to only communicate with the firewall while the firewall can still communicate with any server.
The downside here is the cost of enterprise grade equipment. Considering that, I’ve never been able to try out private VLANs in a homelab, but if I had the opportunity I’d like to confirm a suspicion… what happens if two servers are connected to a switch using private VLAN configuration, but then that switch is connected upstream to a switch that is not configured with private VLAN? My suspicion is that the upstream switch would receive packets from devices on the downstream switch that were destined for hosts in the same subnet that are also connected on the downstream switch. Doing its job as a switch, the upstream switch would forward the packets right back to the downstream switch without the packet ever being evaluated by the firewall. Thus a simple misconfiguration of private VLANs in the network as a whole would compromise the entire security design.
PXE/TFTP Server
The PreeXecution Environment (PXE) provides supporting BIOS systems a source from which to receive a bootable image and/or configuration. Allows a system to boot from the network to an OS without an OS being installed on any local disk.
Certainly Microsoft has its own flavor of PXE boot service, called Windows Deployment Server (WDS). They also provide free software for advanced Windows OS deployment, called Microsoft Deployment Toolkit (MDT). By using the configuration editor, called Deployment Workbench, you can design a “lite touch” deployment scenario for your Windows OS, including driver packages and 3rd party applications.
Microsoft Deployment Toolkit
The limitation of MDT and Deployment Workbench is that they only run on Windows systems. However, the PXE bootable image it creates can be loaded into a Linux PXE server
First install the Windows host for MDT
CPU: 2x vCPU in 1 socket
Mem: 8GB
HDD1: 40GB #OS storage
HDD2: 50GB #storage for deployment share
IP: 192.168.1.15
hostname: deploy
Admin: deployprojadmin
PW: deployprojadmin
OS: Windows 10
After the OS has been installed, install the appropriate version of the Windows ADK, selecting the following features:
Create a new deployment share in the secondary 50GB HDD. Setup of the MDT configuration is beyond the scope of this article - you’ll find some documentation for this in the previous link. However, to involve the PXE server we will need to generate a boot image from the MDT. To do this, right-click on the deployment share object in the left-hand navigation tree, in Deployment Workbench once you have it open. This will generate the first-time configuration and boot images, though with the deployment share being empty and unconfigured the boot images will need some tweaking before they are useful.
Back on the PXE server, bring over the boot image ISO and follow the steps in this article to mount the ISO and copy the boot files to the location the PXE server needs.
A Linux-based PXE server has 3 configuration components (in addition to your OS installation image, of course):
DHCP server options (could be from a co-hosted service or from a separate DHCP server)
TFTP/FTP server
PXE options and menu build
In this build I lace together the services of a DHCP server (previously established on a separate server) and a TFTP server (new). Both based on CentOS 7.
Begin by installing CentOS to a new virtual machine (VM)
Set DHCP options for the IP subnets you wish to access the PXE server. Here I’m assuming that you’re running a DHCP service in Linux, on the same or different service host.
vi /etc/dhcp/dhcpd.conf
In the subnet definition section of your file set the following options, with comment included to call out the PXE section
#IP of PXE Servernext-server 192.168.1.14;
filename "pxelinux.0";
…then in the general options section of the DHCP config file, add these lines
Now you should be able to access your PXE server connection when you boot a new computer/server/VM, using the PXE boot option of the available BIOS for your system.
Automated OS install with Kickstart file
I did not test this implementation, but the source article provided the following notes on setting a automation for the OS installation process
The kickstart file required a root password to complete the CentOS install (to set it for the root account in the installed OS). Since it will be stored in plain text in the kickstart file it is important to encrypt it. Here ‘Pxe@123#’ is the example root password. The command below outputs the encrypted password as string, which you substitute for [encrypted_root_pw] below
openssl passwd -1 Pxe@123#
The default kickstart file is /root/anaconda-ks.cfg, which you could reference for options. Create a blank file
To enable the automation for a particular PXE option block, edit your PXE config file
vi /var/lib/tftpboot/pxelinux.cfg/default
and the following to your existing APPEND line
ks=ftp://192.168.1.14/pub/centos7.cfg
Press [esc]:wq to save and quit
Remote Host Management
Host management encompasses several technologies:
Remote Desktop Protocol (RDP)
Virtual Network Computing (VNC)
Intelligent Platform Management Interface (IPMI) for servers (known as Integrated Management Module - IMM - for IBM servers)
Remote Administration Tool (RAT) - custom built software package for remote management, locally installed to the managed host
TeamViewer
AnyDesk
LogMeIn
Custom web-based management API
Cockpit for linux
SSH/SFTP/SCP
Subsections of Remote Host Management
Cockpit for Linux
Cockpit is a remote host management system for Linux hosts, allowing management through a web portal hosted locally on the Linux host via a lightweight web server. As such, and like all remote management systems, enabling Cockpit carries inherit risks since this technology allows anyone with knowledge of system access to issue any command to the host. Cockpit is capable of managing system services, viewing all running processes, running commands (even as root), and more.
Modify Cockpit to Defeat Automatic User Session Login
Cockpit supports passing your local user session login details to the remote host, through the web browser session. This can be helpful if your local host and the remote host are both joined to the same domain, and you are logged in to your local host with your domain credentials. In this situation your domain user session details (kerberos ticket) will be passed through the web browser to the remote host and you’ll be logged in to the remote host under your domain user account, automatically.
However, this automatic login behavior can be problematic if your local user account does not have administrative permission on the remote host, yet your intend is to log in to the remote host as the administrator. The workaround is to log off of Cockpit after the automatic login so that you can login under your admin account. rather frustrating
Unfortunately Cockpit does not provide configuration options for this behavior, so to modify Cockpit’s automatic login we must change Cockpit’s source HTML.
The auto login feature (and other advanced features of the login page) are coded as JavaScript functions at the top of the HTML file. There are some good comments in this section, so I eventually found the function responsible for the auto login: function I. Unfortunately, deleting or commenting out I breaks the login page pretty badly. I found that it really must be left in place, but that I could achieve the desired effect by altering the call for function I (happens in the code block just before the function I definition). function q seems to be related to login functions, and based on my trial-and-error experience, it is the magic function to replace I with.
Altering Cockpit HTML
Edit the login HTML page file with:
vi /usr/share/cockpit/static/login.min.html
Search for function I, as your reference point, by typing /function I then press [enter]. Use n to find the next instance of the search term (p would find the previous). In the code block just before function I (commented with /*Try automatic/kerberos authentication*/) you’ll see the following originals - replace these lines with the new lines as indicated:
Original
New
} else if (o) {
} else if (o) {
q(i);
q(i);
} else {
} else {
I();
q(i);//I();
}
}
So now, in either case q runs and I never will. Now the login page will never try to autologin using the local session kerberos ticket. Now we need to restart the Cockpit service:
systemctl restart cockpit
SCP vs. SFTP
From my expeditions into the internet I’ve found that there is much confusion around Secure Copy (SCP) and related protocols like Secure File Transfer Protocol (SFTP). There are plenty of forum posts and search queries of the type “Which is more secure, SCP or SFTP?” The short answer is: SFTP is preferred, though SCP can be fine. Sounds like there is more to it? Well there is, and to understand the answer better let’s first touch on how files were transferred through the early internet.
Original Network File Transfer Programs
When computer networking and the internet were young there was little to no focus on, and no need for, robust security. Therefore commands like rcp and ftp were just fine, even though they are woefully insecure by today’s standards. The habits that users formed using these commands were difficult to banish. Today we must worry about (and write extensive articles about) which command is the most secure, lest we ever forget the lesson of putting security second.
In the late 1990s security was eventually added to the older network file transfer commands - new scp and sftp commands were created. These commands rely on SSH connections for security, but otherwise utilize the original protocols to be effective. While these commands continue to be maintained through the OpenSSH package, it’s doubly true that the commands are based on much older commands and that both incorporate SSH. Therefore, as far as the security of the connection is concerned: SCP and SFTP are equally secure.
Another Contender, FTPS
But they were all of them deceived, for another command was made…
…but seriously, another variation of secure FTP service was made, FTP over SSL. It’s fine choice for those who want to use it, though an argument can be made that SFTP is superior in environments that are already capable of SSH. FTPS requires the use of ports 989 and 990, and must have an X.509 certificate (from a public certificate authority). Meanwhile SFTP uses your existing port 22 (because it runs over SSH’s port) and utilizes SSH’s configured certification method. Adding FTPS to your environment that already has SSH configured means extra work configuring firewalls and certification, when you could just piggyback on SSH.
Who is SSHFS?
Some may know of yet another command, sshfs. This command is for connecting to a remote host’s file system using SSH, allowing you to create a mount point or “mapping” to access the remote file system locally. In actuality sshfs runs over SFTP, so the security of the command and other considerations are the same as those for SFTP.
So how does SFTP work out to be the “preferred” method?
No surprise, this recommendation comes with a slight caveat. Before OpenSSH version 9 scp was still based on the original rcp command, which had some limitations I’ll discuss below, but which ultimately meant that scp was not as performant for some operations and had many vulnerabilities that couldn’t be mitigated without breaking command functionality. The caveat is that in OpenSSH version 9 a change was made to completely retool scp so that it now uses sftp in the backend. So now, scp is sftp, and this concludes the argument over which is better.
But why was old scp abandonded? Though the underlying SSH connection was just as secure in scp as it was insftp there were other flaws that could be exploited maliciously. Typically only by authorized users though.
In one scenario an scp connection would request a file from a remote host, but would not check the filename of the file returned by the remote host, which would see scp accept any file from the remote host. scp was later fixed to check the filenames of the files it would receive, but at that time OpenSSH noted that scp was “outdated, inflexible and not readily fixed”.
In another scenario, requesting a filename that includes single quotes and a section in backticks would result in the ability to execute arbitrary code included within the backtick section on the remote host.
So, in short, OpenSSH understood the codebase of sftp to be more robust and wished to support it over the work required to fix scp (which would also likely break it).
Windows SSH/SCP and GUI Utilities
Since I prefer to run Windows as my everyday driver, and management host, I’ve certainly needed SCP-like functionality between my Windows environment and my Unix-like servers from time to time. What to do since SSH has historically been Unix-only? Well, ever since Windows 10 version 1809/Windows Server 2019, Windows has included support for OpenSSH (including SSH, SCP, and SFTP). Therefore, you can initiate an ‘ssh’, ‘scp’, or ‘sftp’ session directly from Powershell (or Command Prompt, should you choose).
WinSCP
However my preferred utility for managing SCP connections from my Windows host is WinSCP. This GUI utility provides excellent file transfer management, over an SCP or SFTP connection (and some others too). The software also provides an SSH client direct from the GUI. It uses the features of SSH and your chosen protocol to show directory listings in the GUI, and can also keep directories automatically synced while the connection is active. Connection properties can also be saved so that remote hosts can be revisited quickly in future.
Rsync
And lest we forget, there is also rsync, which is an extremely capable tool, though somewhat to it’s own detriment. Many users complain that Rsync’s options are too complex for daily use, requiring such a verbose command specification that issuing an rsync command with sane behavior constraints may require up to 6 or more command line switches. Most are appreciative of the simpler command syntax of ‘scp’ and even ‘sftp’ for daily use, over that of rsync.
References
I leaned a lot from the following articles as I researched for this summary:
Note that ssh.com is not affiliated with OpenSSH or the SSH protocol or a governing body in control of SSH… they are a security consulting firm with a confusing website name
A very lightweight server and client for testing network performance (throughput, bandwidth, etc) between the endpoints running the iPerf server and iPerf client.
iPerf’s home page, documentation, download, and credits can be found here: https://iperf.fr
Subsections of iPerf3
Running iPerf3 Commands
Likely helpful to disable firewall for the iperf3 host:
“use bandwidth of 10,000 Mbits, or as much as possible
Commands
A random assortment of commands for reference
Subsections of Commands
Linux: ARP Command
Note
net-tools package deprecation
The net-tools linux package is an old one, and provides a large number of standard commands:
arp
ifconfig
iptunnel
iwconfig
nameif
netstat
net-tools was deprecated in 2011. While is it still available it is advisable to move on to more modern commands.
ARP commands are useful for showing the ARP table in use by the OS. Certainly the ARP table will contain the MAC addresses of known network nodes.
ip n
ip n
ip n
ip n
Tip
n for neighbor
Install the ip command with:
dnf -y install iproute2
apt -y install iproute2
apk add iproute2
pacman -Syu iproute2
Linux: Default Gateway
Note
net-tools package deprecation
The net-tools linux package is an old one, and provides a large number of standard commands:
arp
ifconfig
iptunnel
iwconfig
nameif
netstat
net-tools was deprecated in 2011. While is it still available it is advisable to move on to more modern commands.
The standard command for showing IP address in Linux is ip a. ip also provides an option to view configured gateways:
ip r
ip r
ip r
ip r
Here is an example of adding a default gateway:
ip route add default via 192.168.1.1
If your distribution or container is missing this command you can add it with:
dnf -y install iproute2
apt -y install iproute2
apk add iproute2
pacman -Syu iproute2
Linux: Disk Space Usage
Simple command to show disk space used for all connected file systems, in human readable sizes instead of bytes
df -h
df -h
df -h
df -h
Linux: Network Connection Statistics
Note
net-tools package deprecation
The net-tools linux package is an old one, and provides a large number of standard commands:
arp
ifconfig
iptunnel
iwconfig
nameif
netstat
net-tools was deprecated in 2011. While is it still available it is advisable to move on to more modern commands.
Troubleshooting network applications is often aided by reviewing the applications on the system with open ports, waiting for network traffic to connect. To do this in a Linux terminal, run this command:
ss -tulpn
ss -tulpn
ss -tulpn
ss -tulpn
ss options mean:
Switch
Meaning
t
show TCP connections
u
show UDP connections
l
show listening sockets only
p
include PID for listening processes
n
faster output by skipping resolving IP addresses to hostnames
Install the ss command with:
dnf -y install iproute2
apt -y install iproute2
apk add iproute2
pacman -Syu iproute2
Linux: Ping Command
Though many commands in Linux don’t match to Windows, in the case of ping it does:
ping <ip address|hostname>
ping <ip address|hostname>
ping <ip address|hostname>
ping <ip address|hostname>
If missing from your distribution or container, install with:
dnf -y install iputils
apt -y install iputils
apk add iputils-ping
pacman -Syu iputils
Linux: PS Command
In Linux use the ‘ps’ command to list running processes. Sometimes I’ve found this basic command missing from Linux containers.
ps aux
ps aux
ps aux
ps aux
If missing from your distribution or container, install with:
dnf -y install procps
apt -y install procps
apk add procps
pacman -Syu procps-ng
Linux: Resolve DNS Names to IP Address
Another part of standard troubleshooting for network connections is testing your DNS server connectivity and name resolution. In Windows this is command would be nslookup; in Linux it’s:
drill <hostname>
drill <hostname>
drill <hostname>
drill <hostname>
Note
dig is an older command for doing DNS lookups. It considered legacy and has been replaced with drill in many distributions
installing dig
dnf -y install bind-utils
apt -y install dnsutils
apk add bind-tools
pacman -Syu bind
If missing from your distribution or container, install with:
dnf -y install ldns
apt -y install ldnsutils
apk add drill
pacman -Syu ldns
Linux: Setting Static or Dynamic IP Address
Virtually no computer used today would not have an IP address of some kind assigned to it. Here’s how to assign IP address settings in various Linux OS flavors. See the following sections for commands to show the current IP settings:
Command: Show IP Address
ip a
ip a
ip a
ip a
Command: Show Default Gateway
ip r
ip r
ip r
ip r
Command: Show DNS Server
drill <hostname>
drill <hostname>
drill <hostname>
drill <hostname>
Command: Ping
ping <ip address|hostname>
ping <ip address|hostname>
ping <ip address|hostname>
ping <ip address|hostname>
Direct Configuration File Method
The various Linux OS families have different ways to set their IP address (on the command line), typically through a configuration file and a restart of a system service.
vi /etc/NetworkManager/system-connections/<IFACE_NAME>.nmconnection
systemctl restart NetworkManager
vi /etc/network/interfaces
systemctl restart networking
vi /etc/network/interfaces
vi /etc/resolv.conf
/etc/init.d/networking restart
In this case, like many others, even though Ubuntu is a Debian derrivative it doesn’t follow Debian’s example, and has to do it it’s own ‘special’ way:
vi /etc/netplan/<interface>_config.yaml
netplan apply
NetworkManager Method
Many distributions support various network managers - command line tools to consolidate and simplify the commands to manage IP address settings. Several distributions support NetworkManager and I’ve made notes here to show how to install NetworkManager and the commands to set static IP values
apk add networkmanager
rc-service networkmanager start
rc-update add networkmanager default
adduser <your username> plugdev #you will need to relog to apply the new group membershipnmtui
The net-tools linux package is an old one, and provides a large number of standard commands:
arp
ifconfig
iptunnel
iwconfig
nameif
netstat
net-tools was deprecated in 2011. While is it still available it is advisable to move on to more modern commands.
Another standard command needed for common troubleshooting in every OS - in Linux you show IP addresses with:
ip a
ip a
ip a
ip a
If missing from your distribution or container, install with:
dnf -y install iproute2
apt -y install iproute2
apk add iproute2
pacman -Syu iproute2
Linux: Vi Command
An essential function for any computer system is file editing. In Linux Vi (or Vim being the enhanced version) is the standard command line text editor.
vim
vim
vim
vim
If missing from your distribution or container, install with:
dnf -y install vim
apt -y install vim
apk add vim
pacman -Syu vim
Linux: View DNS Server
While Linux provides straight forward command for viewing the ip address configured on your host (ip or ifconfig), none of these commands include information about your DNS servers. To view your DNS servers use:
cat /etc/resolv.conf
cat /etc/resolv.conf
cat /etc/resolv.conf
cat /etc/resolv.conf
DNS servers are typically managed through the network manager for your distribution, or directly through network configuration files
Red Hat Family OS's: Extending Root Partition
Windows easily allows extending a partition, while the disk is in use or “online”. Extending a partition is a common task when managing guests in a virtual environment. This process has always been straight forward in Windows, but the Linux commands had eluded me for some time.
Fedora 30 maintains the root partitions as a volume group - a composition from several partitions made into one logical volume. So the solution is to create a new partition, empty and of the size you wish to exapand your root partition by, then add it to the volume group. xvda is the designation for the virtual disk attached to my guest that I’ll be adding the new partition to.
Tip
if your virtual disk needs to be expanded to make free space for the new partition, then do that first using your hypervisor’s controls
Creating the new partition
fdisk /dev/xvda
n #new partitionp #primary type partition[enter]#default option[enter]#default option[enter]#default optionw #write partition tableq #quit fdisk
Note
The next code section uses the vgextend command to modify a volume group. To list your volume groups use vgdisplay
Adding the new partition xvda3 to the volume group
For command line environments the default locations where the terminal will look for executable programs is called the Path. The path may have several directories noted in it, meaning that all of the noted locations will be searched for executable files to match the command that you’re issuing. The purpose of the path is to save system users the time it would take to type a full file path to each executable file they want to run. Path is the reason why, when you type ‘cmd’ or ‘ipconfig’ or any other command, your command runs even though you did not specify C:\Windows\System32 in front of it (which is the directory where many commands live).
When you create your own programs or commands certainly you would like to run them without needing to specify the file path to them, and you can do so by modifying the path variable to include the directory where you store your own programs. Certainly you could also just place your programs in the C:\Windows\System32 folder, however that is not recommended for several reasons:
Modifying the contents of this folder (including adding or removing files) requires system administrator permission. Modifying the path variable allows normal system users to enjoy the benefits of path too (though non-admins should modify the non-system version of the path variable instead).
The C:\Windows\System32 folder is meant for Windows system files - files that are provided with an installation of Windows. Including your own programs breaks that file organization. Windows updates will also assume that the Windows folder does not contain user files, so future updates or restores could overwrite your files stored in this location.
Other file system locations are more suitable, such as: C:\Program Files or C:\Users\<my user>\Programs
As an example, let’s add the C:\Program Files\Scripts directory to the system path variable, by using Windows Powershell. C:\Program Files\Scripts is not located in a user accessible area - you must be a system administrator to modify the contents of the C:\Program Files directory. However, I am the system administrator and I also want to ensure that the script that I am including in this directory is available to all users. If the script were placed in C:\Users\<my user>\Programs (or similar) then only I would be able to access it. However I would use C:\Users\<my user>\Programs or similar if I were working on a system that I did not have administrator permissions to.
Note
The command below comes in two parts: setting the value of the path variable in my local Powershell session, then committing that value to the system path variable permanently
That’s it! Note the use of the += operator which tells Powershell to add the string that I specified to the existing value of $env:path, rather than removing the previous value of $env:path and replacing it. This preserves what was in the path before (things like C:\Windows\System32) so that the other programs in the system don’t break. That is also the point of the ; at the start of the string - each file path stored in the path variable is separated by a semicolon, but typically there isn’t one already on the end of the existing path, so we add that first.
System Properties GUI
Also keep in mind that you can edit the system path variable through the System Properties window, on the Advanced tab, in the Environment Variables window. You can get to these windows through the File Explorer, by right-clicking on ‘This PC’ and then select Properties, then find ‘Advanced system settings’ at the bottom of the page. Alternatively you can open a run box and run the command systempropertiesadvanced to jump right there.
Windows: Verify File Checksums
Windows doesn’t provide a brilliant utility for verifying the checksum value on files (typically a task I want to perform on files downloaded from the internet). Well… in fact there is a utility, however the biggest drawn back is how it only generates the hash of the file while stopping short of comparing the file hash to the checksum provided by the website. That’s a feature I believe deserves support in a checksum utility, so I’ve created my own in a Powershell script.
## File Checksum Verifier## Calculate a file's checksum, chosen from a list of supported hashes, then compare to a provided checksum valueparam ($path, $hash, $checksum)$HelpKeywords = @("-h", "-help", "-?")if($HelpKeywords -contains $args[0]){ Write-Output "verify-checksum -path <path to target file> -hash <SHA1|SHA256|SHA512|MD5> -checksum <provided checksum>" exit
}Write-Output "File Checksum Verifier"if(!$path){$TargetFilePath =$(read-host "Path to file").Replace("`"","")} else { $TargetFilePath = $path }
$SupportedHashes = @("SHA1", "SHA256", "SHA512", "MD5")
if ($SupportedHashes -notcontains $hash) {
$HashSelectionMenu = "[1] SHA1
[2] SHA256
[3] SHA512
[4] MD5
"
$HashSelectionPrompt = "Select hash to use (type ? for help)[MD5]"
$HashSelectionMenu do {
try {
$HashMenuSelection = read-host "$HashSelectionPrompt"
if ($HashMenuSelection -eq "") {$HashMenuSelection=4}
if (($HashMenuSelection -ge 1 -and $HashMenuSelection -le 4) -and $HashMenuSelection -as [int])
{
$NoError=$true }
else
{
if ($HashMenuSelection -eq "?")
{
$HashSelectionMenu }
else
{
"Not a menu selection!`n"
}
throw "bad value"
}
}
catch {$NoError = $false}
}
until ($NoError)
$SelectedHash = switch($HashMenuSelection)
{
1 {"SHA1"}
2 {"SHA256"}
3 {"SHA512"}
4 {"MD5"}
default {"MD5"}
}
}
else
{
$SelectedHash = $hash}
if (!$checksum) {$ProvidedChecksum = read-host "Provided Checksum"} else { $ProvidedChecksum = $checksum }
$FileChecksum = $(get-filehash $TargetFilePath -algorithm $SelectedHash).hash
Write-Output "File Checksum: $FileChecksum"
$ChecksumChecksOut = "$FileChecksum" -eq "$ProvidedChecksum"
Write-Output "Checksum matches: $ChecksumChecksOut"
I’ve then placed this file in C:\Program Files\Scripts and added that directory to my system Path variable (see how in this article). Now I simply call the script with verify-checksum. The script accepts the following options: -path for the full path to the file you want a checksum of, -hash to specify which hash to use on the file (one of: SHA1, SHA256, SHA512, or MD5), and -checksum for the checksum value supplied by the website you got the file from. Or, instead of passing everything to the command during the call, it will recognize any and all options missing and prompt you for each one that is still needed (or that did not match an accepted value).
Minecraft
Articles related to Minecraft, the popular video game, including: server hosting and mods
For those wanting to run their own Minecraft server (Java edition) MineOS makes for a straightforward setup. Running any flavor of their platform provides a webUI for managing the server, plus easy tools to download the server binary from the Minecraft website or do updates on it. Choosing to run MineOS (especially the Turnkey full OS option) means you can focus on learning system administration and get strait to enjoying the satisfaction of hosting your own server.
Hosting Options
MineOS provides several iterations to choose from when hosting:
Node.JS webapp that can be added to Minecraft servers hosted in other ways
MineOS built on Turnkey Linux (Debian-based), for a full OS experience that is ready to go through a single installation
A Docker image (though I host a Docker Minecraft server through a different method)
My experience with MineOS was as my first Minecraft server, hosted as a virtual machine some years ago. Many features have been added since, but I would still recommend it for first time Minecraft server administrators, especially if hosting for a small group of friends.
Init Script
It has been years since I ran the system, but at the time I found that I needed a custom init script to start the server and run it as a background process that I could reattach and interact with later on, as needed. Considering the intervening years the init script may not be necessary any longer; it has also been lost. However, the utility that I used to run it in the background (so that it could be reattached) was called screen. The screen utility allowed the server to run in a “detached” (with CTRLASpaceD) terminal that could be reattached (with screen -r) at any point so that commands could be run, or output reviewed.
Please try out MineOS as it stands today - I’d be surprised if an init script would be needed these days
Miscellaneous
Articles that don’t have a category, yet
Subsections of Miscellaneous
Breaking into Windows 10 locally
Warning
Note that this technique may be patched in the latest versions of Windows 10 / Windows whatever-version-we’re-on. It may also be detected and automatically mitigated by antivirus software. If that’s the case then this article is kept for archival reasons.
Note
This technique requires the use of a Windows 10 installation ISO, Windows PE, or Linux Live CD
From time to time you may find that you’re locked out of your account in Windows. Well… if you have local access to the machine running Windows (meaning you can force a reboot and a temporary boot device) then there is a convenient vulnerability still present in Windows after all these years that will allow you to break in.
Insert your installation media and reboot, following the instructions for your BIOS to choose a temporary boot device, and choosing your installation media. If using a Windows 10 installation ISO chose the Repair your computer option. Choose Troubleshoot, then Advanced Options, then Command Prompt. Then run the following commands:
diskpart
list volume
Tip
You’ll have to deduce which volume is the system volume, using trial and error. In my test case there was a 35GB volume mounted on D:, so when I listed the contents of that volume I found the Windows system folder right away, indicating this is the system volume.
Having identified the volume that contains the Windows system (for example D:), we’re going to take advantage of the way that Windows accessibility tools can launch from the login screen, before any user has yet logged in. The accessibility tool is simply an executable in the Windows System32 directory called sethc.exe. The login screen lauches the tool by calling the executable with the name sethc.exe, so we can trick the login screen to launch any executable by setting the desired executable’s name to sethc.exe and placing it in the same path.
To start with, let’s keep a backup copy of sethc.exe in case we want to restore it later (…maybe accessibility is important to your users!)
ren D:\Windows\System32\sethc.exe sethc.exe.bak
While we can cause any executable to be launched from the login screen, likely the most versitile is cmd.exe. Make a copy and name it sethc.exe
And with that you’re set to reboot and regain your access! When you’re back to the login page of your existing Windows installation, press Shift five times to trigger the launch of sethc.exe (our impersonating cmd.exe). Alternately you can launch sticky keys from the accessibility menu icon in the lower right. Doing so should present you with an elevated command window with Administrator access. From here you could enable the built-in Administrator account and set the password for it
net user Administrator [password] /active:yes
Since the built-in administrator account has local administrator permissions, and you know the password to it now (since you just set it), you can log in and take any action you need to, such as resetting the password on any user account, creating a user account, or whatever.
Linux OS Families
All Linux distributions rely on certain types of utilities for basic work, things like package managers and service managers. As distributions fork from other distributions a lineage is formed. Therefore we can rely, to some extent, on families of distributions typically using the same basic utilities as their parent. Outlined below is a non-comprehensive list of distributions and their decedents
Red Hat Family
The popular enterprise flavor of Linux, Red Hat is developed by Red Hat, Inc. It is probably the distribution with the most built in and compatible tools for managed networks. Uses the YUM and DNF package managers.
graph TD;
	B(Fedora) --> C(CentOS Stream)
	C --> A[Red Hat Enterprise Linux]
	A --> D(Rocky Linux)
	A --> E(AlmaLinux)
	A --> F(Oracle Linux)
	A --> G(ClearOS)
	click A "https://www.redhat.com"
	click B "https://getfedora.org"
	click C "https://www.centos.org"
	click D "https://rockylinux.org"
	click E "https://almalinux.org"
	click F "https://www.oracle.com/linux"
	click G "https://www.clearos.com"
Debian Family
Debian is actually less popular than its most popular descendant, Ubuntu. Uses the APT package manager.
graph TD;
	A[Debian] --> B(Ubuntu)
	A --> C(Kali Linux)
	A --> D(Linux Mint)
	A --> E(PureOS)
	click A "https://www.debian.org"
	click B "https://ubuntu.com"
	click C "https://www.kali.org"
	click D "https://linuxmint.com"
	click E "https://pureos.net"
Alpine Family
The Alpine distribution is most often used as a base for light weight container images, due to it’s minimal size and the performance benefits of its design to run entirely in RAM. Uses the apk package manager.
graph TD;
	A[Alpine Linux]
	click A "https://alpinelinux.org"
Arch Family
Created with the objective of being a minimal Linux distribution, Arch was loosely based on another minimal Linux distro called CRUX. Arch uses the pacman package manager.
graph TD;
	A[Arch Linux] --> B(Manjaro)
	A --> C(EndeavourOS)
	A --> D(Garuda Linux)
	A --> E(SteamOS)
	click A "https://archlinux.org"
Suse Family
Suse is one of the oldest Linux distributions still in active development, and is geared towards an enterprise environment. This was the OS I built my first hypervisor on back in 2013, using its built-in virtualization environment. Uses the YaST standard package management system.
graph TD;
	A[SUSE Linux Enterprise Server]
	click A "https://www.suse.com"
Slackware Family
A special mention to Slackware, another very old Linux distribution, and the first Linux OS that I installed. Extremely minimal and package stable, this distro aims to be very trimmed down. Available today with a desktop manager preinstalled it used to be command-line only. It was a fork of Softlanding Linux, back around the dawn of Linux.
graph TD;
	B(Softlanding Linux System) --> A[Slackware Linux]
	click A "http://www.slackware.com"
It used to be possible to monitor your Windows 10 client with SNMP by enabling it in Windows Features, however SNMP has been deprecated since Windows 10 version 1809. This article stands as a reminder that it is no longer supported in modern version of Windows. Microsoft offers Common Information Model (CIM) as the preferred replacement service.